|
|
|
AT Commander's
SAS Jeep
 The SAS (Special Air Service) was the brainchild of David Sterling, a
british officer with an affinity for nontraditional warfare. He envisioned
small, highly trained groups of specialized troops in small groups infiltrating
enemy lines and wreaking havoc before returning to their own lines again.
He devised this plan while laying in a hospital bed, and also came up with
the SAS logo and motto (at right). The winged dagger is recognizable even
at a glance. "Who Dares Wins" typified the personality of every
The SAS (Special Air Service) was the brainchild of David Sterling, a
british officer with an affinity for nontraditional warfare. He envisioned
small, highly trained groups of specialized troops in small groups infiltrating
enemy lines and wreaking havoc before returning to their own lines again.
He devised this plan while laying in a hospital bed, and also came up with
the SAS logo and motto (at right). The winged dagger is recognizable even
at a glance. "Who Dares Wins" typified the personality of every SAS member in those early days. Initial attempts to create this airborne
force met with misfortune; their first exercises and operations were nothing
less than disasters. Things changed when they came upon the idea of using
the Long Range Desert Group (a desert recon organization) to give them
taxi service to and from the enemy areas. Things began looking up. Things
took a quantum leap forward when they were able to secure some Willys jeeps.
Now they could transport themselves to their targets and home again!
SAS member in those early days. Initial attempts to create this airborne
force met with misfortune; their first exercises and operations were nothing
less than disasters. Things changed when they came upon the idea of using
the Long Range Desert Group (a desert recon organization) to give them
taxi service to and from the enemy areas. Things began looking up. Things
took a quantum leap forward when they were able to secure some Willys jeeps.
Now they could transport themselves to their targets and home again!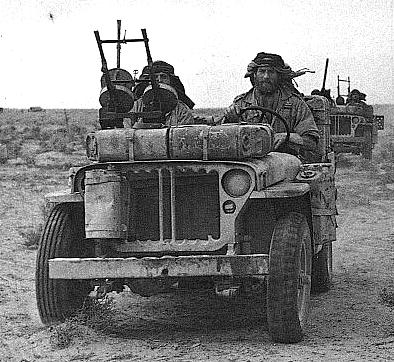 They seriously lacked firepower, however, and
had trouble securing any kind of heavy machine guns. They came across some
Vickers K-Guns (of WW1 fame) that seemed to fit the bill. They mounted
these, usually in pairs, on their Willys jeeps, giving each 2 or 3 man team
awesome firepower! They carried full loads of survival equipment, fuel,
ammunition, explosives, and grenades on each mission. In addition, they
often pre-staged caches of supplies along their route for future use. They
stripped all excess metal off the jeeps to reduce their weight - making room
for more cargo. You can see in these pics that they removed not only windshields
and mirrors, but even sheet metal like the radiator grille elements! Thus
armed, their first mission was an astonishing success as they drove down
an enemy airfield at night, strafing and destroying many enemy aircraft on
the ground. If parked aircraft counted toward an "ace" rating, these guys
would've made it several times over in a matter of minutes as they tore up
the enemy airfield and left little behind save burning buildings and smoking
aircraft fuselages. The SAS
They seriously lacked firepower, however, and
had trouble securing any kind of heavy machine guns. They came across some
Vickers K-Guns (of WW1 fame) that seemed to fit the bill. They mounted
these, usually in pairs, on their Willys jeeps, giving each 2 or 3 man team
awesome firepower! They carried full loads of survival equipment, fuel,
ammunition, explosives, and grenades on each mission. In addition, they
often pre-staged caches of supplies along their route for future use. They
stripped all excess metal off the jeeps to reduce their weight - making room
for more cargo. You can see in these pics that they removed not only windshields
and mirrors, but even sheet metal like the radiator grille elements! Thus
armed, their first mission was an astonishing success as they drove down
an enemy airfield at night, strafing and destroying many enemy aircraft on
the ground. If parked aircraft counted toward an "ace" rating, these guys
would've made it several times over in a matter of minutes as they tore up
the enemy airfield and left little behind save burning buildings and smoking
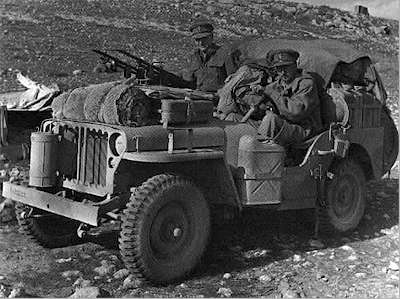
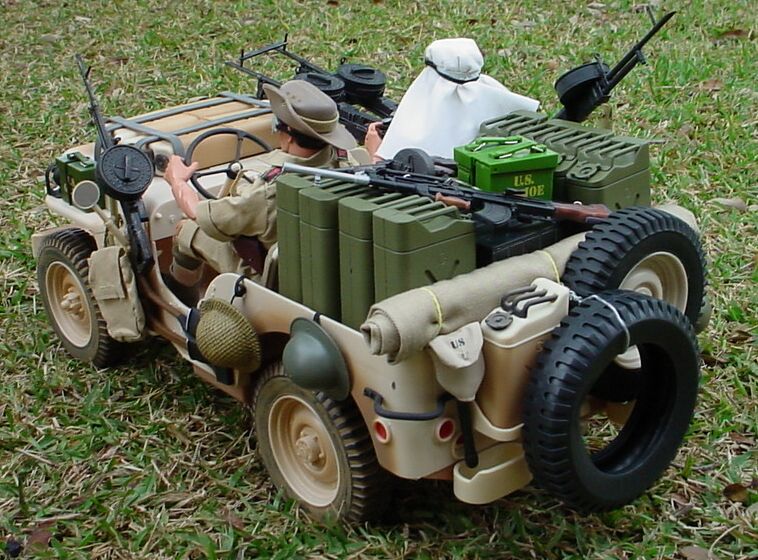
aircraft fuselages. The SAS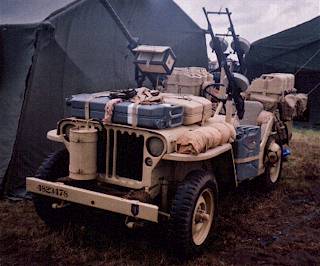 had arrived! Note in the
pic above left, the single rear-facing AA Vickers on the passenger side.
Note also in the second vehicle the forward-facing low-mounted .50 and the
twin rear-facing
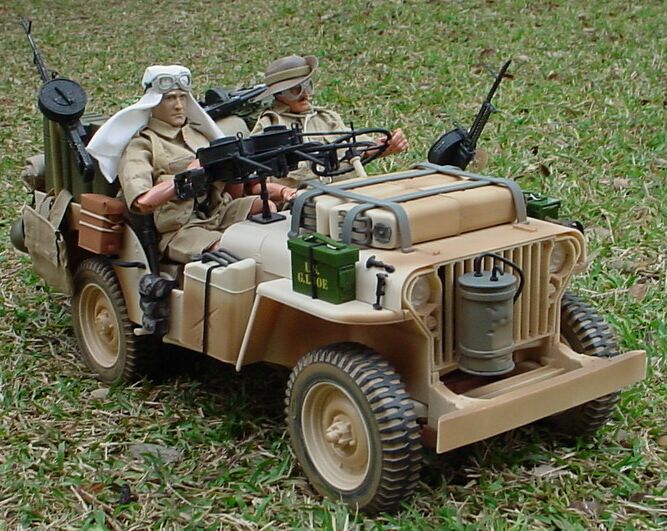
Vickers K-guns. As near as I can tell, the typical(?) SAS jeep had a twin
Vickers for the gunner, a single Vickers for the driver, and rear-facing
twin Vickers for AA use. Near as I can tell, only one of the SAS jeeps
in the desert was lucky enough to score a Ma Duce (.50). Each jeep seemed
to have its own configuration and personality, depending on the crew and
the availability of weaponry. At the right is a reenactor's vehicle that
seems to be a model of the rear vehicle in the photo above - it's got a
low-mount .50, a rear twin Vickers and a single Vickers for the driver.
This sure appears to be either a nicely restored vehicle or a super re-creation!
had arrived! Note in the
pic above left, the single rear-facing AA Vickers on the passenger side.
Note also in the second vehicle the forward-facing low-mounted .50 and the
twin rear-facing
Vickers K-guns. As near as I can tell, the typical(?) SAS jeep had a twin
Vickers for the gunner, a single Vickers for the driver, and rear-facing
twin Vickers for AA use. Near as I can tell, only one of the SAS jeeps
in the desert was lucky enough to score a Ma Duce (.50). Each jeep seemed
to have its own configuration and personality, depending on the crew and
the availability of weaponry. At the right is a reenactor's vehicle that
seems to be a model of the rear vehicle in the photo above - it's got a
low-mount .50, a rear twin Vickers and a single Vickers for the driver.
This sure appears to be either a nicely restored vehicle or a super re-creation!
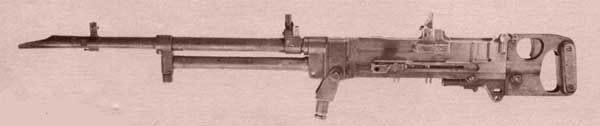
Here's the Vickers K-Gun. These were .303 aircraft
machine guns that had an incredible rate of fire - usually a disadvantage
for ground troops. When an aircraft is dodging, yawing, diving, climbing,
and turning, the gunner only has a few split seconds to fill the target full
of lead. This is why these K-guns were designed. The original SAS troopers
found some of these weapons, unused and unloved, and put them to good use.
After all, they were planning raids on enemy airfields in fast-moving jeeps
and were shooting at enemy planes - it was (almost) a natural fit! The
biggest advantage of these weapons was their availability. In a renegade
unit that had to rely on scrounging equipment, availability often meant
more than suitability. The SAS troopers were mission oriented and flexible
enough to "make it work" and had enough creativity to find suitable workarounds.
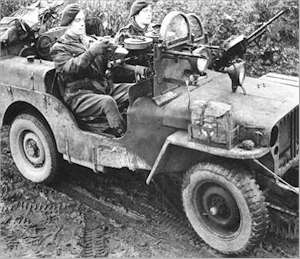 After the SAS moved to Europe, they were reportedly misused, and their
capable commando jeeps were relegated to duties more fitting for regular
combat troops or armored cars (the SAS jeeps were decidedly NOT armored, although
they made a very limited move in that direction before the war ended). In
the pic at left, you can see how the jeep evolved. No longer were they as
worried about weight - they weren't going a thousand miles behind enemy lines
through the desert any more. Although the grille is still showing prior
desert duty, you can see the addition of weight in the form of armor in front
of the driver and gunner. Note that the
After the SAS moved to Europe, they were reportedly misused, and their
capable commando jeeps were relegated to duties more fitting for regular
combat troops or armored cars (the SAS jeeps were decidedly NOT armored, although
they made a very limited move in that direction before the war ended). In
the pic at left, you can see how the jeep evolved. No longer were they as
worried about weight - they weren't going a thousand miles behind enemy lines
through the desert any more. Although the grille is still showing prior
desert duty, you can see the addition of weight in the form of armor in front
of the driver and gunner. Note that the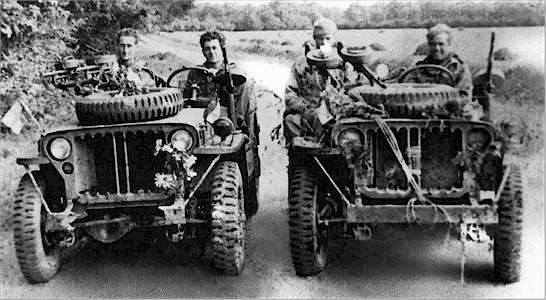 driver has a single Vickers so he can get in on the action, too! The
multiple gas cans have been replaced by large, permanent fuel tanks behind
the driver and gunner. In the pic at right, you
driver has a single Vickers so he can get in on the action, too! The
multiple gas cans have been replaced by large, permanent fuel tanks behind
the driver and gunner. In the pic at right, you 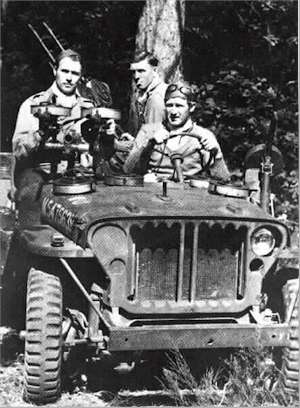 can see the ETO version of these jeeps without
the armor. Again, note the driver's single Vickers K-gun. Too bad the
Hasbro jeep didn't come with another Vickers! In the pic at left, you
can see a relatively uncommon 3-man team; usually the rear-facing guns were
for AA use - the gunner would use those if being tailed across the desert
by enemy aircraft. In this pic, it seems apparent that they intend to use
all 5 K-guns simultaneously, giving this little jeep incredible firepower! I'd hate to be in the front seat when the rear gunner swivels those twin Vickers K-guns around to face forward... it looks like they'd be about ear-height to the driver and front gunner, not giving the rear gunner much room to swing; Maybe they intended these to be rear-firing only or for anti-aircraft use.
can see the ETO version of these jeeps without
the armor. Again, note the driver's single Vickers K-gun. Too bad the
Hasbro jeep didn't come with another Vickers! In the pic at left, you
can see a relatively uncommon 3-man team; usually the rear-facing guns were
for AA use - the gunner would use those if being tailed across the desert
by enemy aircraft. In this pic, it seems apparent that they intend to use
all 5 K-guns simultaneously, giving this little jeep incredible firepower! I'd hate to be in the front seat when the rear gunner swivels those twin Vickers K-guns around to face forward... it looks like they'd be about ear-height to the driver and front gunner, not giving the rear gunner much room to swing; Maybe they intended these to be rear-firing only or for anti-aircraft use.
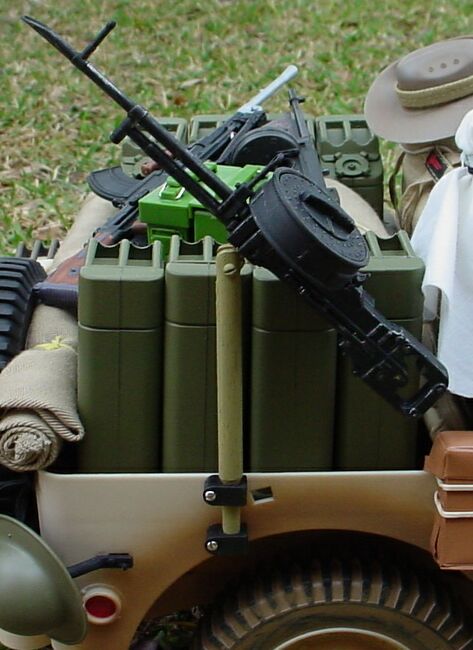
 Loading
supplies, ammo cans, tarps, and spare equipment to our Hasbro jeep wasn't
a big
deal (and certainly not worth web space), but the "quick and easy" details and customizations are worth
mentioning. Most notable is the twin Bren guns added in the rear, the ammo
can mounts, and the external gas can mount.
Loading
supplies, ammo cans, tarps, and spare equipment to our Hasbro jeep wasn't
a big
deal (and certainly not worth web space), but the "quick and easy" details and customizations are worth
mentioning. Most notable is the twin Bren guns added in the rear, the ammo
can mounts, and the external gas can mount.
 I decided to add optional twin bren guns just for kicks. Although I did
quite a bit of research, I couldn't find ANY historical precedent for mounting
Brens this way - but did it anyhow. The original SAS guys used whatever
equipment they could scrounge, and I had two unused SOTW Bren guns in the
junkbox. I had a .50 as well, but thought it just didn't look British enough
with a .50 on the dash (even though the restoration/repro pictured above sports a .50 on the dash).
I decided to add optional twin bren guns just for kicks. Although I did
quite a bit of research, I couldn't find ANY historical precedent for mounting
Brens this way - but did it anyhow. The original SAS guys used whatever
equipment they could scrounge, and I had two unused SOTW Bren guns in the
junkbox. I had a .50 as well, but thought it just didn't look British enough
with a .50 on the dash (even though the restoration/repro pictured above sports a .50 on the dash).
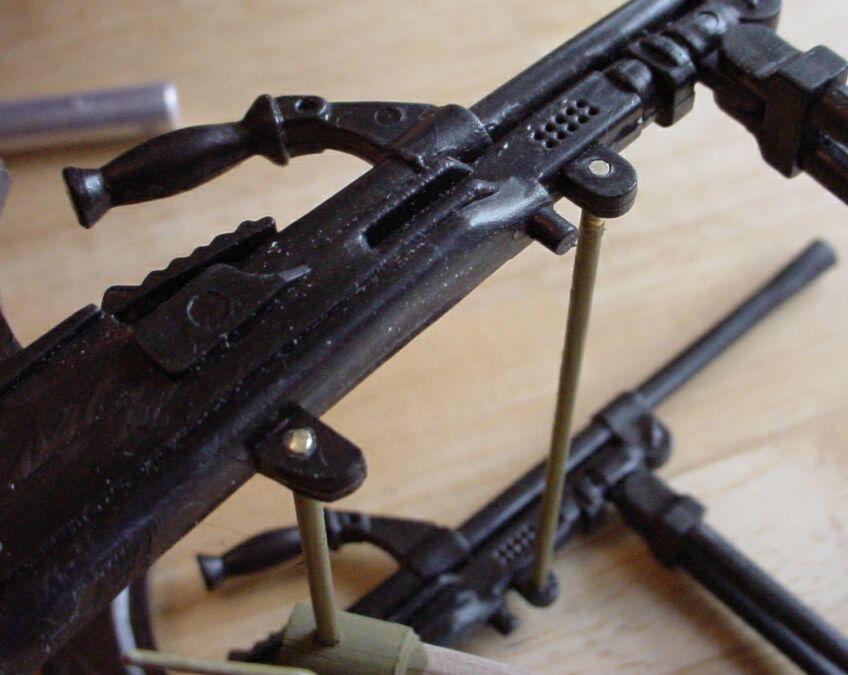 Here's a pic showing the mounting arrangement. Fortunately for customizers,
Hasbro left the .50 pedestal mount socket on the floor of this jeep version.
I simply added a dowel the right diameter (I had to add a single layer
of masking tape to make it a tight fit), and cut it to the height I wanted.
This is really open to preference, because there is no windshield to worry
about clearing. Mounting the twin Brens promised to be tricky at best...
however, upon
closer examination it
became apparent the folks at SOTW designed their Brens with this project
in
mind! The Brens had two tabs beneath the MGs to mount them with! The purpose
of these mysterious tabs is unknown to me, and I confess I've spent more
time typing this sentence than trying to figure it out. (I don't really
care, I guess.) I had some brass rod (of unknown diameter) in my junk box
and thought it'd do the job. I drilled a hole in each of the tabs under
the Bren to accept the brass rod (pressure fit). I lined up a Joe and decided
how far apart I wanted the Brens, then simply cut the brass rod the appropriate
length.
Here's a pic showing the mounting arrangement. Fortunately for customizers,
Hasbro left the .50 pedestal mount socket on the floor of this jeep version.
I simply added a dowel the right diameter (I had to add a single layer
of masking tape to make it a tight fit), and cut it to the height I wanted.
This is really open to preference, because there is no windshield to worry
about clearing. Mounting the twin Brens promised to be tricky at best...
however, upon
closer examination it
became apparent the folks at SOTW designed their Brens with this project
in
mind! The Brens had two tabs beneath the MGs to mount them with! The purpose
of these mysterious tabs is unknown to me, and I confess I've spent more
time typing this sentence than trying to figure it out. (I don't really
care, I guess.) I had some brass rod (of unknown diameter) in my junk box
and thought it'd do the job. I drilled a hole in each of the tabs under
the Bren to accept the brass rod (pressure fit). I lined up a Joe and decided
how far apart I wanted the Brens, then simply cut the brass rod the appropriate
length.
 Mounting the Brens on the pedestal was
no trick at all. After cutting the pedestal the right length, I drilled
a vertical hole in the very top of the pedestal. (This hole will accept
a 21C .50 if I ever decide to put one there.) I used a smaller diameter
dowel and turned it against a belt sander to reduce the diameter to fit
the pedestal's vertical hole. Then I drilled a horizontal hole in the small
dowel to slide on the brass rod. When the Brens sat in their mount, they
simply spun down into a vertical position and didn't angle skyward like
real ones would. I found a piece of piano wire (visible in the photo at
right) that was bent in the shape of a wide "Y" that rests under the Bren
receivers and keeps them from elevating too far.
Mounting the Brens on the pedestal was
no trick at all. After cutting the pedestal the right length, I drilled
a vertical hole in the very top of the pedestal. (This hole will accept
a 21C .50 if I ever decide to put one there.) I used a smaller diameter
dowel and turned it against a belt sander to reduce the diameter to fit
the pedestal's vertical hole. Then I drilled a horizontal hole in the small
dowel to slide on the brass rod. When the Brens sat in their mount, they
simply spun down into a vertical position and didn't angle skyward like
real ones would. I found a piece of piano wire (visible in the photo at
right) that was bent in the shape of a wide "Y" that rests under the Bren
receivers and keeps them from elevating too far.
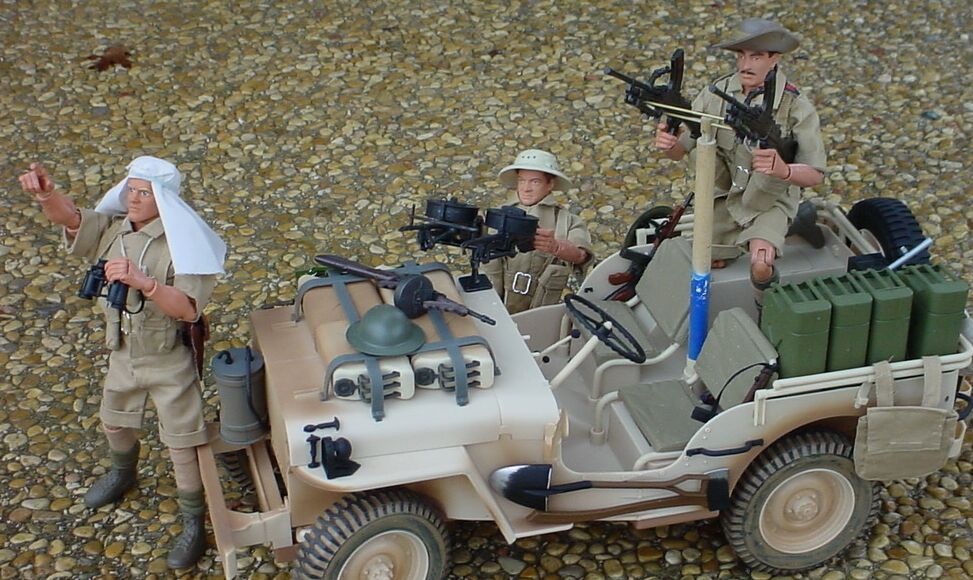
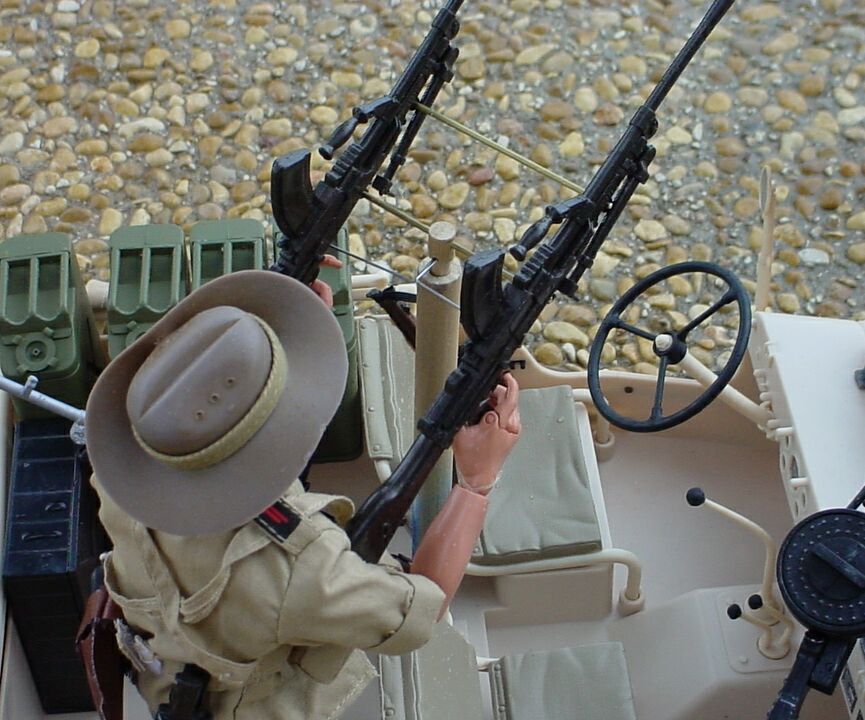
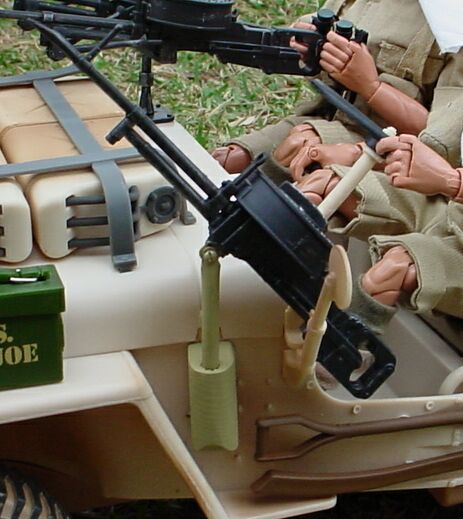
Here's a pic of the Prototype SAS Crew fending
off an attack from and enemy fighter that
spotted their dust while fleeing across the desert. Notice the vertical
dowel? It's blue! Yep, last weekend was the Pinewood Derby race in scouts
and this dowel was used to hold a car while a kid spray-painted it. That
happened to be the one I used for this project. In case you're wondering,
that's GI Bob in the pith helmet, the Brit Marine Commando in the Aussie
hat, and an unknown Joe in the raghat. The raghat was made from a piece of
cloth draped over a Joe's noggin - the extra was cut off and I put a few stitches
in it to make it hold the head shape. I added a white cloth elastic to keep
it on his head.
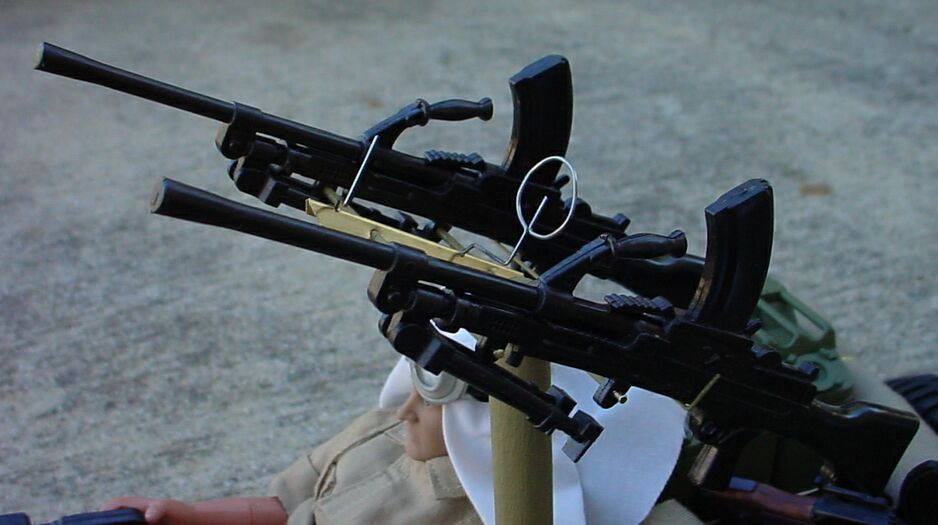 Here's a pic of the AA sights I added. They're a prototype and I haven't
decided whether I like the idea of twin brens or not. For now, they're a
spare armament that we'll use for Backyard Patrols when enemy air power is
a threat, otherwise we'll just leave 'em stowed or on the shelf. I think
the AA sights "dress up" the mount a bit and make the twin bren a tad classier.
Maybe I'll do a finished version when I get the time.
Here's a pic of the AA sights I added. They're a prototype and I haven't
decided whether I like the idea of twin brens or not. For now, they're a
spare armament that we'll use for Backyard Patrols when enemy air power is
a threat, otherwise we'll just leave 'em stowed or on the shelf. I think
the AA sights "dress up" the mount a bit and make the twin bren a tad classier.
Maybe I'll do a finished version when I get the time.
I've seen pics of SAS jeeps with ammo cans,
1st aid kits, and tarps mounted on the fenders. I  thought the addition of ammo cans to the fenders of this jeep would look
groovy and would at least have a hint of realism. The challenge was adding
the ammo cans without altering the vehicle more than absolutely necessary.
I was also worried about this goofy soft plastic Hasbro made the jeep out
of - I didn't think regular model glue
thought the addition of ammo cans to the fenders of this jeep would look
groovy and would at least have a hint of realism. The challenge was adding
the ammo cans without altering the vehicle more than absolutely necessary.
I was also worried about this goofy soft plastic Hasbro made the jeep out
of - I didn't think regular model glue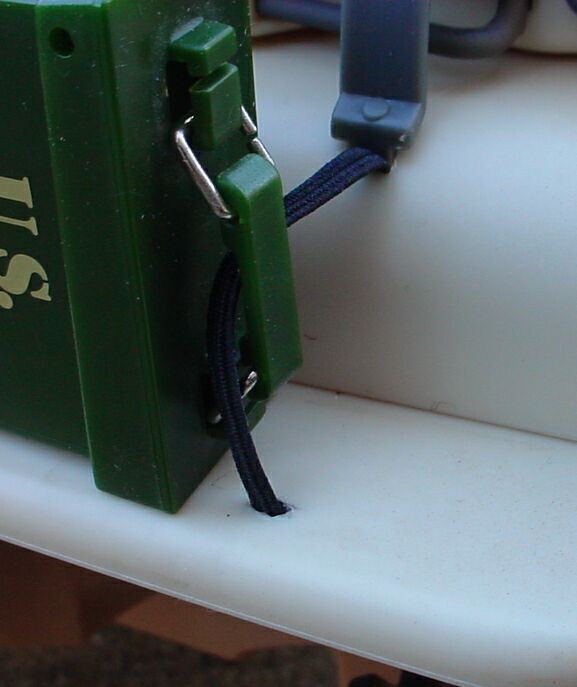 would
work and didn't feel like experimenting; so I wanted to do it all
without glue. Another catch was that I needed a removable mount. In the end, I was able to add removable
cans and only made one small hole in each fender. I used thin cloth elastic,
like rifle slings are made of. I made a small rectangular hole in each fender
large enough to accommodate the elastic and stuck it through, then knotted
it underneath the fender. To make the hole, I heated a pin up over a candle
so it was red hot, then just poked it through the hole I'd pre-marked. I
dragged the pin in the shape of the hole, then used a sharp, think X-acto
to clean up the hole. To affix the top of the strap, I just lifted the hood-mount
gas can rack at the point it attaches to the jeep and stuck the elastic
in the hole... and reinserted the rack mounting tab back in the hole. Easy!
Removing the ammo can is quick and easy, too; just unplug the hood gas
can rack mount from the hole. Adding these cans was about the easiest
mod on a vehicle I've ever done!
would
work and didn't feel like experimenting; so I wanted to do it all
without glue. Another catch was that I needed a removable mount. In the end, I was able to add removable
cans and only made one small hole in each fender. I used thin cloth elastic,
like rifle slings are made of. I made a small rectangular hole in each fender
large enough to accommodate the elastic and stuck it through, then knotted
it underneath the fender. To make the hole, I heated a pin up over a candle
so it was red hot, then just poked it through the hole I'd pre-marked. I
dragged the pin in the shape of the hole, then used a sharp, think X-acto
to clean up the hole. To affix the top of the strap, I just lifted the hood-mount
gas can rack at the point it attaches to the jeep and stuck the elastic
in the hole... and reinserted the rack mounting tab back in the hole. Easy!
Removing the ammo can is quick and easy, too; just unplug the hood gas
can rack mount from the hole. Adding these cans was about the easiest
mod on a vehicle I've ever done!
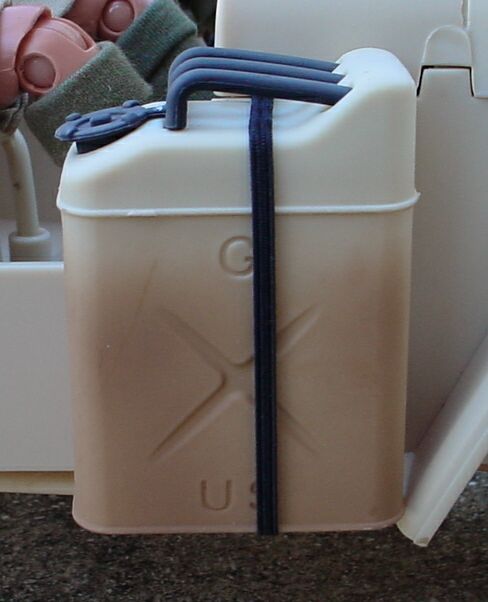 The jeep came with an extra gas can. That was nice of Hasbro to
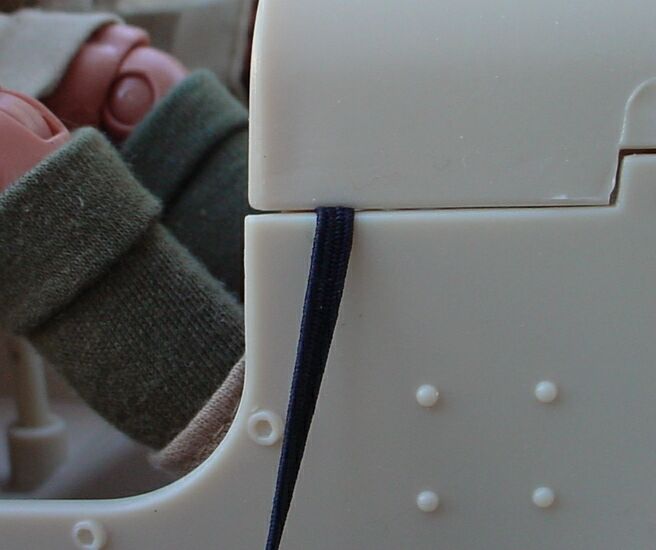 include. It belonged in a rack somewhere, though. At first, I wasn't
sure how to mount it with minimal modification... th en
the obvious hit me! The front vehicle halves left a crack at exactly the
right height, and the plastic was very pliable. The plan came together.
I made a small hole underneath the vehicle (like I did for the ammo can)
and stuck the elastic through. I put a knot in it and - Voila! - the bottom
of the strap was attached. I threaded it through the gas can handles and
stuck it in the crack where the top and bottom halves of the vehicle came
together and put a knot in it - now the top of the strap was affixed. Another
easy solution!
include. It belonged in a rack somewhere, though. At first, I wasn't
sure how to mount it with minimal modification... th en
the obvious hit me! The front vehicle halves left a crack at exactly the
right height, and the plastic was very pliable. The plan came together.
I made a small hole underneath the vehicle (like I did for the ammo can)
and stuck the elastic through. I put a knot in it and - Voila! - the bottom
of the strap was attached. I threaded it through the gas can handles and
stuck it in the crack where the top and bottom halves of the vehicle came
together and put a knot in it - now the top of the strap was affixed. Another
easy solution!
 As a side note, the handles/grips on the Vickers wasn't particularly accurate,
nor is it useful for
Joe's grip. The CC hands are too big, the GHG hands won't work well,
the Cots hands aren't suitable... AARGH! I found that the bendy hands are
fine, though. When I picked up a LIFE figure on clearance for $4.98, I
was interested in checking out the bendy hands. I absolutely despised them!
I couldn't imagine what possessed Hasbro to come up with this silly idea!
Putting them on a non-SA body was an even worse idea! When the bad design
of the Vickers grips met the silly design of the bendy hands, they kind of
matched - and it works & looks great. Has could've done something to
make that opposable thumb more useful, though.
As a side note, the handles/grips on the Vickers wasn't particularly accurate,
nor is it useful for
Joe's grip. The CC hands are too big, the GHG hands won't work well,
the Cots hands aren't suitable... AARGH! I found that the bendy hands are
fine, though. When I picked up a LIFE figure on clearance for $4.98, I
was interested in checking out the bendy hands. I absolutely despised them!
I couldn't imagine what possessed Hasbro to come up with this silly idea!
Putting them on a non-SA body was an even worse idea! When the bad design
of the Vickers grips met the silly design of the bendy hands, they kind of
matched - and it works & looks great. Has could've done something to
make that opposable thumb more useful, though.
 Here's the driver's side Vickers mount. I thought about bunch of different
approaches as well as some used in the past (like on the Gunship project,
elsewhere on my site, I used the axle-mount from a worthless 5-Star trailer).
This time, I thought I'd use a mix of wood, brass, and plastic. I mounted
it low, so the driver can get at it easliy without leaving him in a goofy
position to reach the wheel or shifter. This was a concession toward playability
and a little of a departure from reality - mine's lower than they probably
should've been. The SAS jeeps didn't seem to keep the mirrors (reflections
were probably unwanted if you're trying to avoid being noticed), but I left
the mirror on my jeep because it made a practical rest for the rear of the
single Vickers MG.
Here's the driver's side Vickers mount. I thought about bunch of different
approaches as well as some used in the past (like on the Gunship project,
elsewhere on my site, I used the axle-mount from a worthless 5-Star trailer).
This time, I thought I'd use a mix of wood, brass, and plastic. I mounted
it low, so the driver can get at it easliy without leaving him in a goofy
position to reach the wheel or shifter. This was a concession toward playability
and a little of a departure from reality - mine's lower than they probably
should've been. The SAS jeeps didn't seem to keep the mirrors (reflections
were probably unwanted if you're trying to avoid being noticed), but I left
the mirror on my jeep because it made a practical rest for the rear of the
single Vickers MG.
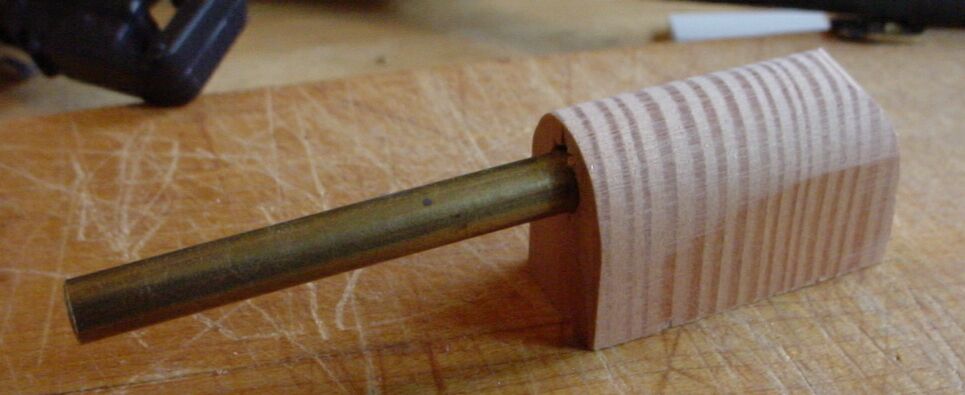 Back
to the mount. The sponson in the above pic was made of wood. The benefit
is that you can easily shape and contour wood any way you want with little
difficulty. Another benefit is that a piece of brass tubing inserted into
a hole drilled in the hole makes a dandy mount that permits the brass rod
to rotate freely. No, I have no idea what diameter the brass tubing is, nor
do I know what diameter my hole is. When creating, I usually just do it
without thinking about making a reproducible project... this is a relaxing
hobby, after all, and I'm not OCD enough to keep track of the minutae. Keeping
too close track of my steps cramps my creativity. ;-)
Back
to the mount. The sponson in the above pic was made of wood. The benefit
is that you can easily shape and contour wood any way you want with little
difficulty. Another benefit is that a piece of brass tubing inserted into
a hole drilled in the hole makes a dandy mount that permits the brass rod
to rotate freely. No, I have no idea what diameter the brass tubing is, nor
do I know what diameter my hole is. When creating, I usually just do it
without thinking about making a reproducible project... this is a relaxing
hobby, after all, and I'm not OCD enough to keep track of the minutae. Keeping
too close track of my steps cramps my creativity. ;-)
 One problem was mounting the single MG on the brass rod. I used a butane
torch with a cutting head to make a slot in the bottom of the Hasbro MG.
I also heated up a brass tab and crammed it in the slot, making it even
deeper. Then I slid in a piece of sheet plastic and glued it in place. In
the pic at left you can see the plastic tab in teh slot, as well as the plastic
that oozed out when I drove in the hot brass tab. Now I had a tab on the
bottom of the MG to use as a mounting point - and this will also permit an
excellent elevation capability. After taking this pic, I drilled a hole
in the tab for mounting. It worked well.
One problem was mounting the single MG on the brass rod. I used a butane
torch with a cutting head to make a slot in the bottom of the Hasbro MG.
I also heated up a brass tab and crammed it in the slot, making it even
deeper. Then I slid in a piece of sheet plastic and glued it in place. In
the pic at left you can see the plastic tab in teh slot, as well as the plastic
that oozed out when I drove in the hot brass tab. Now I had a tab on the
bottom of the MG to use as a mounting point - and this will also permit an
excellent elevation capability. After taking this pic, I drilled a hole
in the tab for mounting. It worked well.
 Here's the rear-firing passenger's side AA gun. To mount this, I decided
to try something different. I found a picture hook (the little hook you
screw in the back of a picture frame to hold the cable) and re-bent it to
make a smaller hole. Now I think it would've been easier to use a fishing-tackle
type lure screw-in eye. Hindsight 20-20. This time I just used a dowel
to mount the MG. The dowel is affixed to the side of the jeep with a couple
of cable-mounting tabs from Radio Shack that I happened to have in my toolbox
when the inspiration struck. I used my belt sander to reduce the diameter
of the dowel so it'd fit in the black RG-58/9 cable holders. The change
in diameter
Here's the rear-firing passenger's side AA gun. To mount this, I decided
to try something different. I found a picture hook (the little hook you
screw in the back of a picture frame to hold the cable) and re-bent it to
make a smaller hole. Now I think it would've been easier to use a fishing-tackle
type lure screw-in eye. Hindsight 20-20. This time I just used a dowel
to mount the MG. The dowel is affixed to the side of the jeep with a couple
of cable-mounting tabs from Radio Shack that I happened to have in my toolbox
when the inspiration struck. I used my belt sander to reduce the diameter
of the dowel so it'd fit in the black RG-58/9 cable holders. The change
in diameter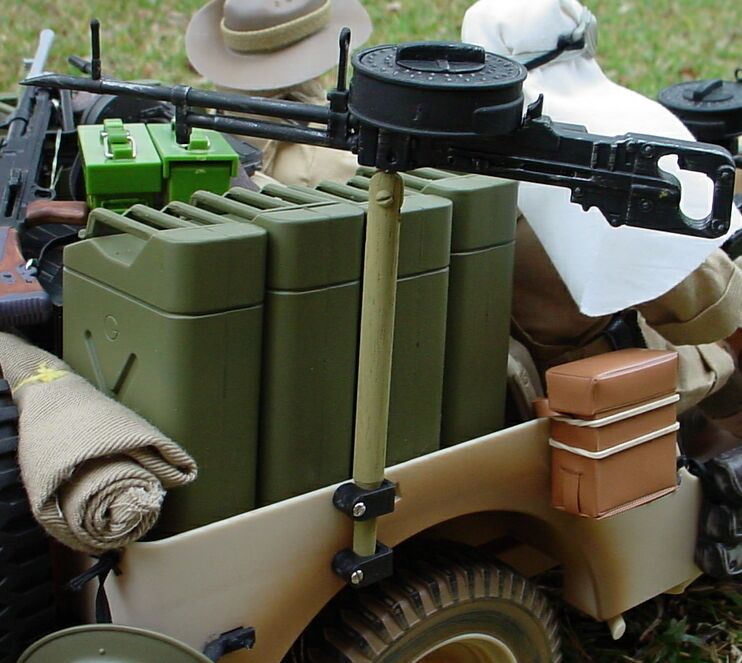 kept the dowel from slipping
all the way down. You can see this in the pics. I attached the black cable
holders to the jeep with small
radio-project type screws (they were the smallest I had). BE CAREFUL drilling
this jeep hull. This is about the softest plastic I've ever worked with!
I hardly applied pressure to the drill and it slipped through the plastic
like a hot knife through butter. Yikes! I think I prefer 5-Star plastic
because I'm more used to it... although this one will probably hold up to
Kid Play a lot better. A little paint on the mount did wonders. I mounted
the MG high enough to clear the Jerry cans, although height on this one
isn't critical.
kept the dowel from slipping
all the way down. You can see this in the pics. I attached the black cable
holders to the jeep with small
radio-project type screws (they were the smallest I had). BE CAREFUL drilling
this jeep hull. This is about the softest plastic I've ever worked with!
I hardly applied pressure to the drill and it slipped through the plastic
like a hot knife through butter. Yikes! I think I prefer 5-Star plastic
because I'm more used to it... although this one will probably hold up to
Kid Play a lot better. A little paint on the mount did wonders. I mounted
the MG high enough to clear the Jerry cans, although height on this one
isn't critical.
Here's a slice of reality that was a bit of an afterthought. The SAS raiders
couldn't use 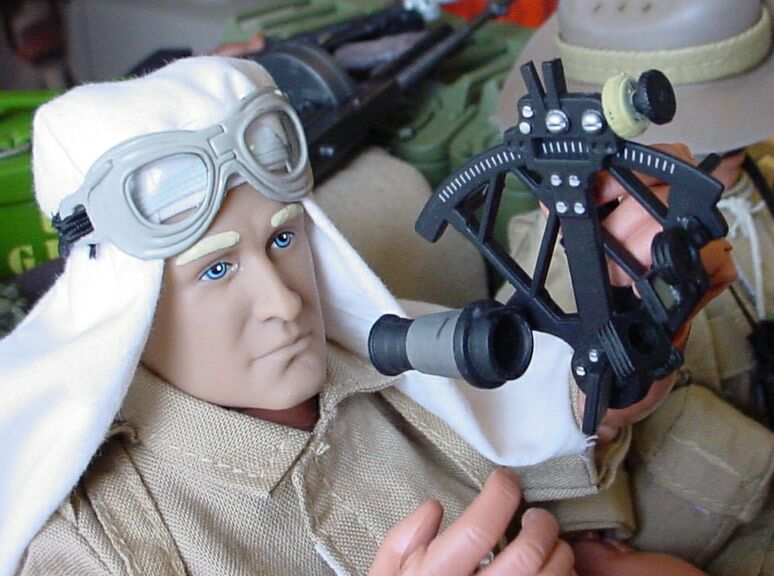 compasses because the potential error was too high. When navigating cross-country
with landmarks, a compass is fine. Navigating across the vast North African
desert is quite another thing! They needed to know with precision where
they were, for a navigational error of only a couple of degrees could leave
them a couple of hundred miles off during a 1,000 mile journey. This could
mean the difference between life and death in the hot, dry desert. Water
and fuel was rationed and monitored carefully, and a successful mission or
foray into the desert demanded accurate navigation. I had a sextant from
the 21C submariner in the junkbox, and it makes the perfect addition to the
SAS jeep. The head that was on the bendy-hands guy was swapped onto a GHG
body. The bendies might've been ok on the Vickers, but (as we found out
this morning) they're crummy for general play.
compasses because the potential error was too high. When navigating cross-country
with landmarks, a compass is fine. Navigating across the vast North African
desert is quite another thing! They needed to know with precision where
they were, for a navigational error of only a couple of degrees could leave
them a couple of hundred miles off during a 1,000 mile journey. This could
mean the difference between life and death in the hot, dry desert. Water
and fuel was rationed and monitored carefully, and a successful mission or
foray into the desert demanded accurate navigation. I had a sextant from
the 21C submariner in the junkbox, and it makes the perfect addition to the
SAS jeep. The head that was on the bendy-hands guy was swapped onto a GHG
body. The bendies might've been ok on the Vickers, but (as we found out
this morning) they're crummy for general play.
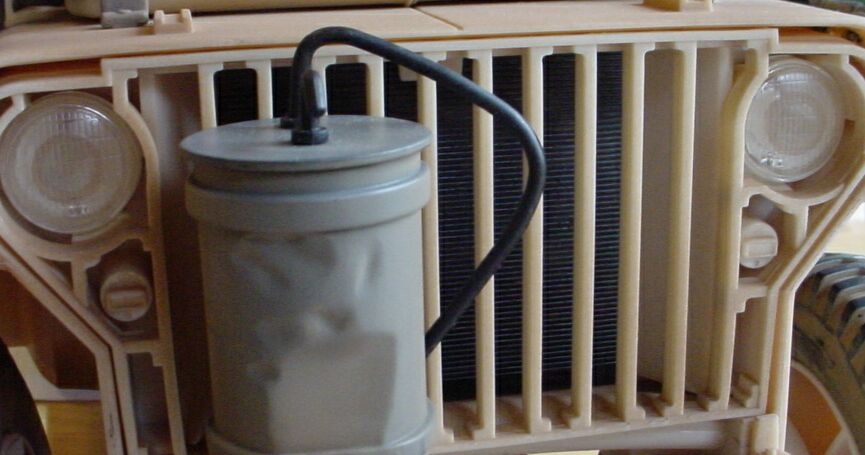 As a final touch, I painted the radiator behind the grille. In order to
mount the sponson on the jeep, I had to put a couple of little screws in the
back, to
affix it to the hull on the driver's side. To get 'em in, I had to unscrew
the jeep parts and open it up (quick and easy, thanks to Hasbro's attention
to the needs of customers like me). While I had it open, I threw a coat of
paint on the radiator. It's pretty visible through the grille, and I thought
this would give it more realism and contrast. I gave it a splotchy coat
of German Grey (Tamiya acrylic) followed by a splotchy coat of Engine Black
(model RR paint) and got the beat-up look I was after (the subtlety of which
doesn't show up in the pic very well).
As a final touch, I painted the radiator behind the grille. In order to
mount the sponson on the jeep, I had to put a couple of little screws in the
back, to
affix it to the hull on the driver's side. To get 'em in, I had to unscrew
the jeep parts and open it up (quick and easy, thanks to Hasbro's attention
to the needs of customers like me). While I had it open, I threw a coat of
paint on the radiator. It's pretty visible through the grille, and I thought
this would give it more realism and contrast. I gave it a splotchy coat
of German Grey (Tamiya acrylic) followed by a splotchy coat of Engine Black
(model RR paint) and got the beat-up look I was after (the subtlety of which
doesn't show up in the pic very well).
For additional info on mounting the MGs, I consulted the instructions for
1/35 scale models of this jeep by Tamiya and the European version by Italeri.
I found the model instructions more helpful than the other web images I
dug up, because the model instructions had some great images from WWII that
I haven't seen anywhere else. (Nope, I haven't got a scanner.) This was
a fun project that was educational for the kids and I, and gave us a cool
project on a crummy, rainy, cold day.
LMK what you think of this project, or any other stuff you stumble across
on my website!
- ATC
Click the logo to go home ![]()
or click the bar to email me, the ATCommander@adventureteam.com ![]()