|
|
|
AT Commander's
FIELD CANNON
As usual, we never seem to
have enough 5-Star tripods. They were pretty fragile and broke easily back
when we were kids. What's the best way to deploy a 5-Star Recoiless Rifle
(hereafter referred to as a "cannon")? Method #1 was to use a plexiglass
platform in the 5-Star trailer with a post to match the cannon. It worked
and was fine for Backyard Battles, but it just wasn't cool enough. Here
is Method #2: build a carriage for it that can be towed behind the 5-Star
and easily deployed for action. We wanted it to look a little German, a
little American and a little British. It needed to have a low trajectory
like an anti-tank gun but also needed to be able to launch like a howitzer.
Here is our solution and some "how-to" directions.
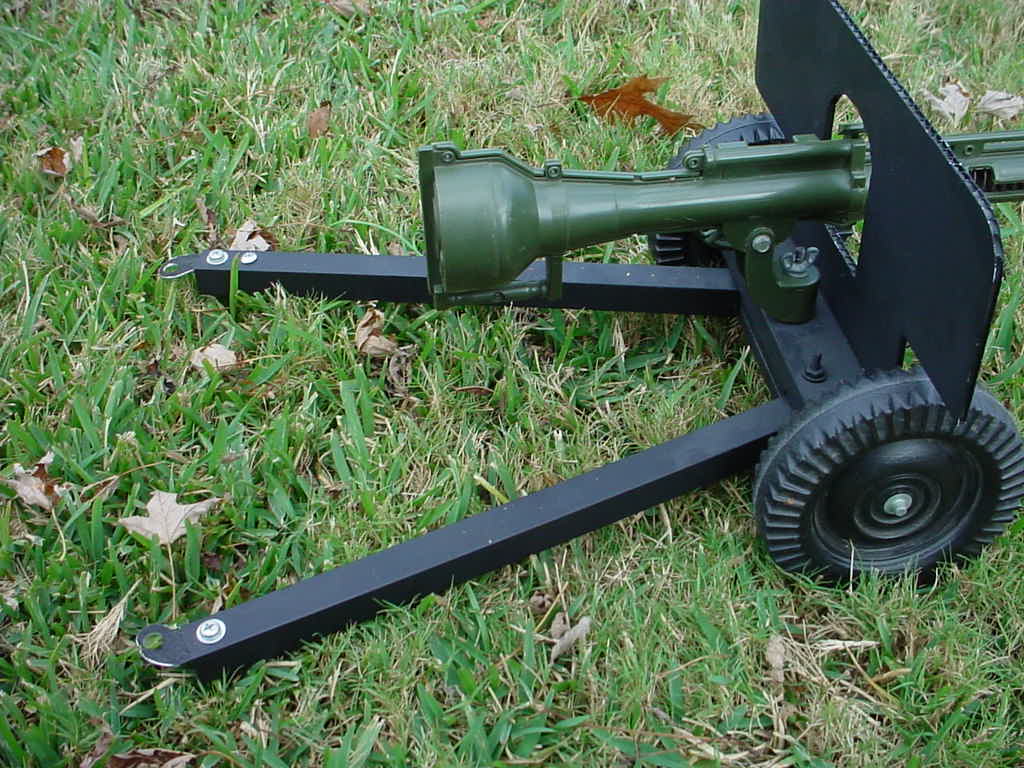 Here is a pic of the "legs" to stabilize the cannon during firing. As you
can see, they pivot out to each side and are hinged to the same mechanism
that provides a base for the axle. The wheels are extra 5-Star wheels (without
hubcaps). I bought a beat-up trailer for $10 that was worthless except for
the wheels. At the time, buying individual wheels was more expensive than
$5 each. It was an ok deal at the time. The axle is a metal rod from Home
Depot with a couple of "hats" (I have no idea what they're really called)
that crimp onto the ends of the axles and retain the wheels in position (just
like the originals on the 5-Star Jeep).
Here is a pic of the "legs" to stabilize the cannon during firing. As you
can see, they pivot out to each side and are hinged to the same mechanism
that provides a base for the axle. The wheels are extra 5-Star wheels (without
hubcaps). I bought a beat-up trailer for $10 that was worthless except for
the wheels. At the time, buying individual wheels was more expensive than
$5 each. It was an ok deal at the time. The axle is a metal rod from Home
Depot with a couple of "hats" (I have no idea what they're really called)
that crimp onto the ends of the axles and retain the wheels in position (just
like the originals on the 5-Star Jeep).
 Here is a pic of the legs folded in position for transport. Nothing in
this project was really planned. It sort of evolved as I built it. The
length of the legs happened to be dictated by the amount of rectangular aluminum
stock I had on hand. The width of the axle roughly approximates the 5-star
wheelbase. The rest of the project was just "eyeballed" as I went along.
Here is a pic of the legs folded in position for transport. Nothing in
this project was really planned. It sort of evolved as I built it. The
length of the legs happened to be dictated by the amount of rectangular aluminum
stock I had on hand. The width of the axle roughly approximates the 5-star
wheelbase. The rest of the project was just "eyeballed" as I went along.
![]() Here's a close-up of the trailer mount. At left it's unlocked and ready
to be deployed and at right it's prepared to be towed. The tow hook itself
keeps the legs locked. The legs are made from an old rectangular stock tubing
that came from an old shower towel holder that made its way into this project
instead of going into the trash. (Actually, replacing the shower towel rod
was the trigger that prompted this project.) The aluminum stock cuts, drills,
and snips easily - yet remains sturdy, so it was good material to work with.
Here's a close-up of the trailer mount. At left it's unlocked and ready
to be deployed and at right it's prepared to be towed. The tow hook itself
keeps the legs locked. The legs are made from an old rectangular stock tubing
that came from an old shower towel holder that made its way into this project
instead of going into the trash. (Actually, replacing the shower towel rod
was the trigger that prompted this project.) The aluminum stock cuts, drills,
and snips easily - yet remains sturdy, so it was good material to work with.
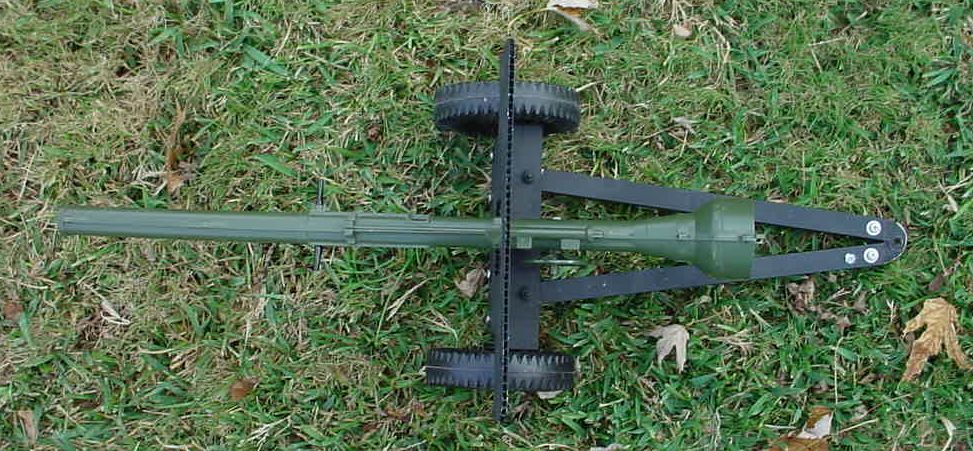
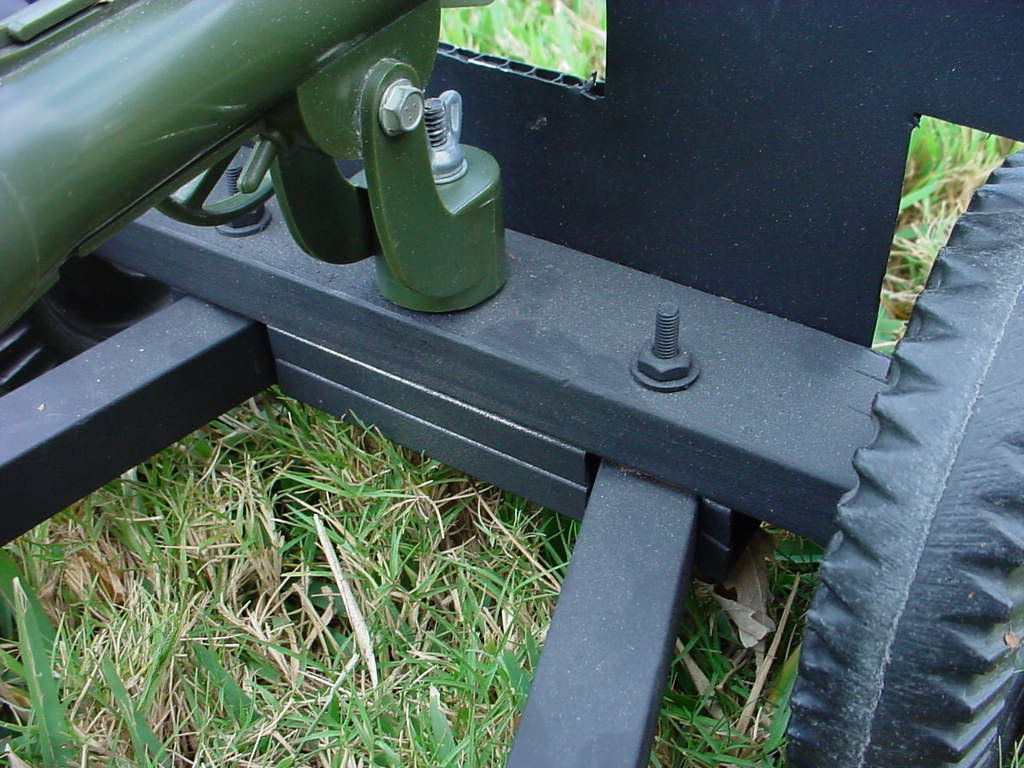 Here is a pic of the mount arrangement. The mount is nothing more than
a dowel the same diameter as a 5-star tripod mount, and I put a bolt through
it, into the gun carriage. On the top of the bolt, I added a wingnut, so
I can screw it down tight to keep it from traversing while it's being towed.
Elevation is accomplished by the original "U" shaped mount. Here you can
also see the bolts that are the pivot points for the legs. The top layer
you're looking at is a strip of wood, beneath which is a square aluminum tube
with two holes cut into it from which the legs protrude. The bolts holding
the legs and the bolt holding the dowel for the cannon mount are all that
secures the aluminum structure to the wooden base.
Here is a pic of the mount arrangement. The mount is nothing more than
a dowel the same diameter as a 5-star tripod mount, and I put a bolt through
it, into the gun carriage. On the top of the bolt, I added a wingnut, so
I can screw it down tight to keep it from traversing while it's being towed.
Elevation is accomplished by the original "U" shaped mount. Here you can
also see the bolts that are the pivot points for the legs. The top layer
you're looking at is a strip of wood, beneath which is a square aluminum tube
with two holes cut into it from which the legs protrude. The bolts holding
the legs and the bolt holding the dowel for the cannon mount are all that
secures the aluminum structure to the wooden base.
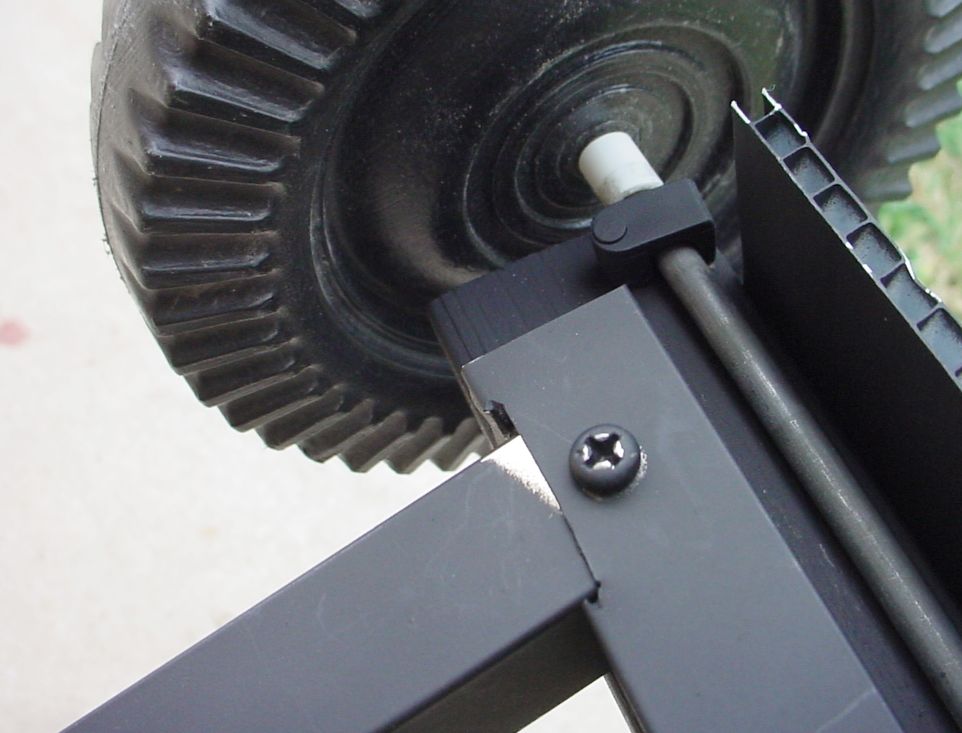 At right you can see a close-up of the pivot point. That flat black paint
really sucks up the light, so it's difficult to see. Ahead of the aluminum
brace where the leg pivot point is attached, you can see the axle holding
on both wheels. There is a white length of tubing that I've used for a washer
to space the wheel, and a black (hard to see) cable clamp that holds the axle
on. These cable clamps are the kind you'd probably find at Radio Shack and
are made to secure TV RG-59U cables. They're little black semicircular plastic
retainers with a nail going through - made to tack the cable retainer to
the wall. Since the main platform here is wood, and the axle is about the
same diameter as a cable TV cable, these cable clamps were an obvious solution
and worked well in this application!
At right you can see a close-up of the pivot point. That flat black paint
really sucks up the light, so it's difficult to see. Ahead of the aluminum
brace where the leg pivot point is attached, you can see the axle holding
on both wheels. There is a white length of tubing that I've used for a washer
to space the wheel, and a black (hard to see) cable clamp that holds the axle
on. These cable clamps are the kind you'd probably find at Radio Shack and
are made to secure TV RG-59U cables. They're little black semicircular plastic
retainers with a nail going through - made to tack the cable retainer to
the wall. Since the main platform here is wood, and the axle is about the
same diameter as a cable TV cable, these cable clamps were an obvious solution
and worked well in this application!
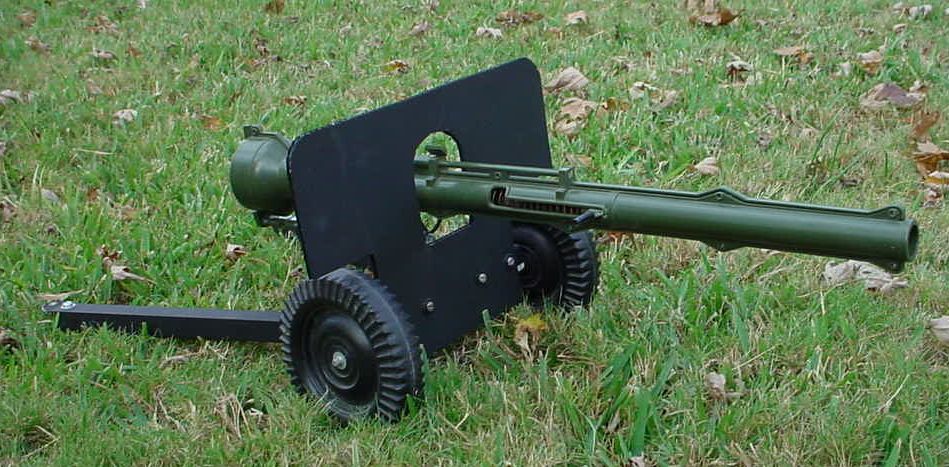
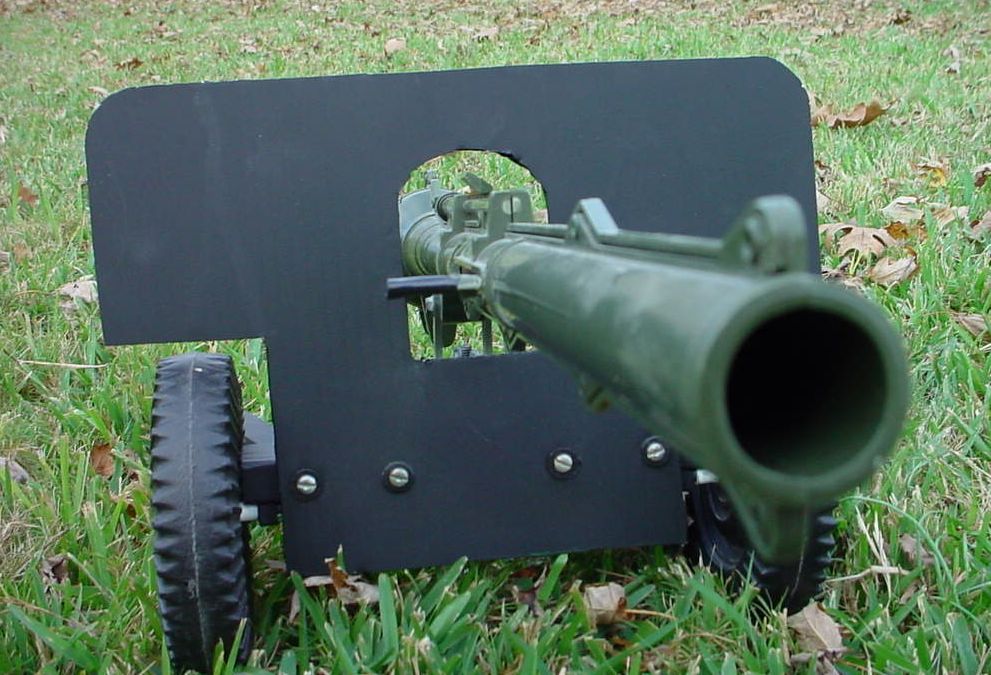 The armor shield was made from plastic corrugated sign material. Remember
the sign you put up for Mayor Stinklebiscuit's reelection? What did you do
with that sign after he was soundly beaten in the election? The material
from discarded election signs is a lot like corrugated cardboard, but it's
plastic. It is flexible, light, and best of all - free! Someday I might
replace it with something else (if I ever get into a detail frensy), but until
then this is dandy for playtime with the kids! It's secured by 4 horizontal
screws and black plastic washers - which may be visible in the pic. The armor
shield, mount, legs, etc, were all painted black, because at the time we
couldn't decide if this looked more German, British, or American. We figured
black was fine for all of them and it could change sides as necessary.
The armor shield was made from plastic corrugated sign material. Remember
the sign you put up for Mayor Stinklebiscuit's reelection? What did you do
with that sign after he was soundly beaten in the election? The material
from discarded election signs is a lot like corrugated cardboard, but it's
plastic. It is flexible, light, and best of all - free! Someday I might
replace it with something else (if I ever get into a detail frensy), but until
then this is dandy for playtime with the kids! It's secured by 4 horizontal
screws and black plastic washers - which may be visible in the pic. The armor
shield, mount, legs, etc, were all painted black, because at the time we
couldn't decide if this looked more German, British, or American. We figured
black was fine for all of them and it could change sides as necessary.
This may not be the prettiest custom work I've done, but it sure has a lot
of play value. The kids love it! By the time I took these pics, it'd already
been banged around the house by an uncivilized tribe of feral children for
over a year, so it's not as crisp as it once was - it's a combat veteran!
It's holding up well, and I confess my kids are pretty careful (I'm blessed,
I guess). Fun project. Quick project. Useful project. If you've got an
old 5-Star cannon around, you might want to try it!
LMK what you think of this project, or any
other stuff you stumble across on my website!
- ATC
Click the logo to go home ![]()
or click the bar to email me, the ATCommander@adventureteam.com ![]()