|
|
|
AT Commander's
M5 Stuart Modifications
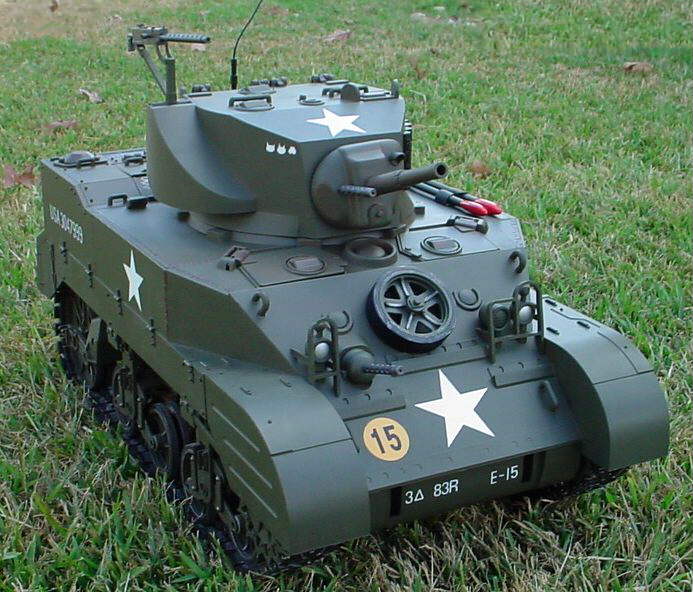
 21st Century has done it! They have come up with the absolutely
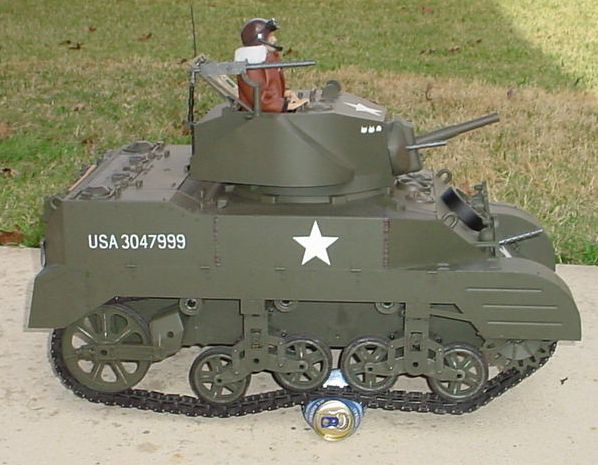 coolest vehicle since Hasbro released the original 5-Star Jeep! This
tank really rocks! It is a 1/6 scale Stuart that is radio controlled,
moves like a real tank ("skid" turning), makes start-up and engine noises
that vary with speed, machinegun special effects, turning turret, and it
even launches a soft-tipped projectile out of the cannon! Waaaaay cool!
As an extra cool little feature, when you fire the cannon, it makes a cannon
firing noise and the whole tank lurches backwards to simulate recoil! Tres
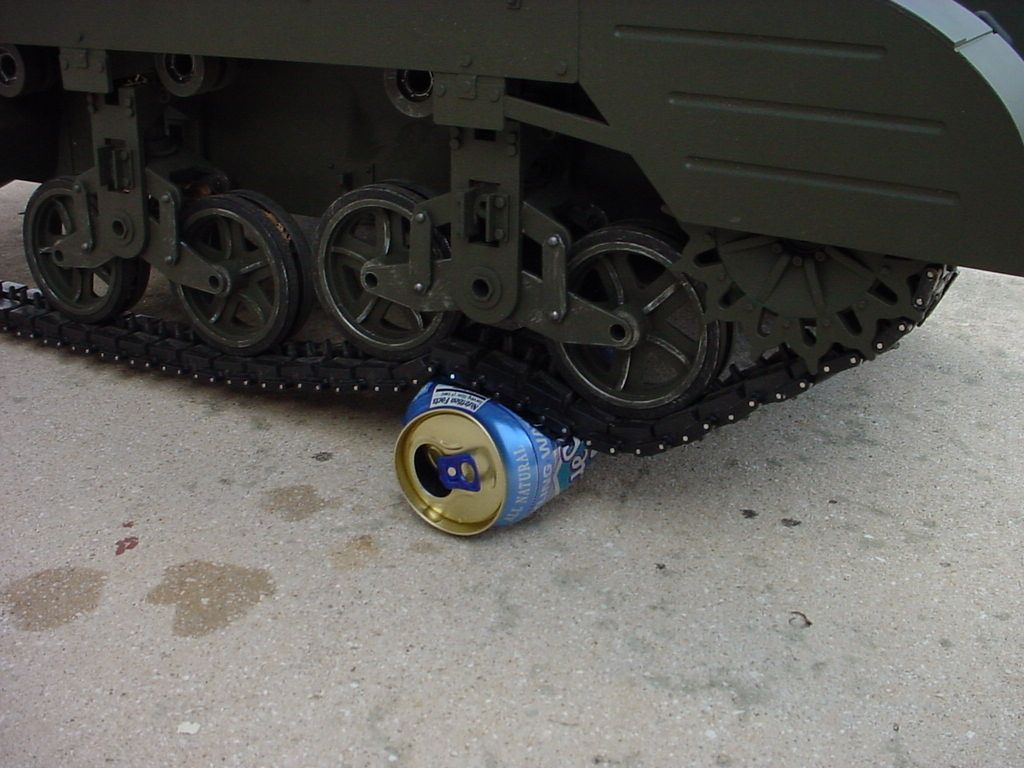
Groovy! Here are a couple of pics of the Stuart crushing a puny soda pop
coolest vehicle since Hasbro released the original 5-Star Jeep! This
tank really rocks! It is a 1/6 scale Stuart that is radio controlled,
moves like a real tank ("skid" turning), makes start-up and engine noises
that vary with speed, machinegun special effects, turning turret, and it
even launches a soft-tipped projectile out of the cannon! Waaaaay cool!
As an extra cool little feature, when you fire the cannon, it makes a cannon
firing noise and the whole tank lurches backwards to simulate recoil! Tres
Groovy! Here are a couple of pics of the Stuart crushing a puny soda pop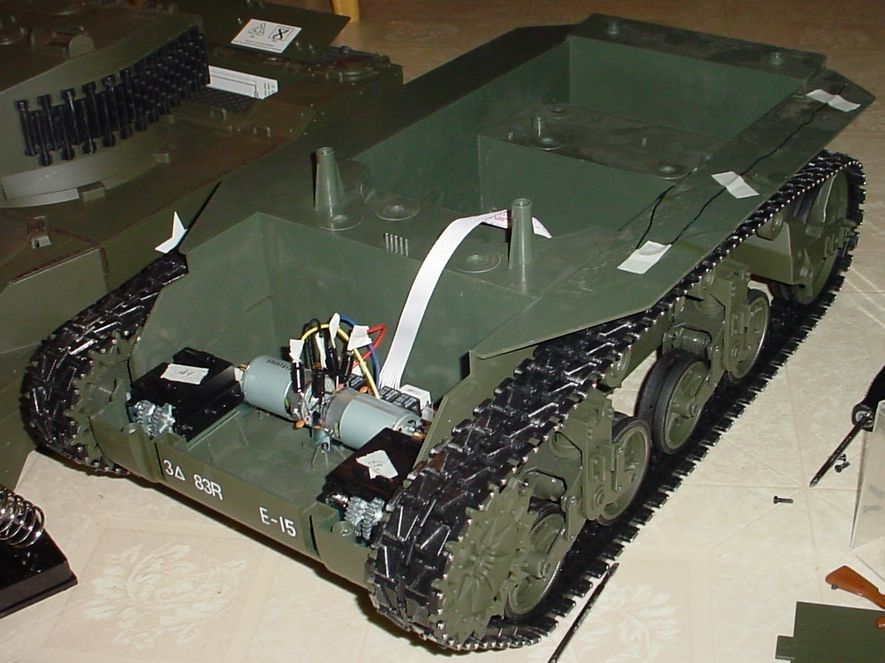 can. I haven't had this much fun with Joes in a long time! Do I really
have to share this one with my kids? At left you can see the chassis
with the hull's shell removed. This looks like it has a LOT of potential
for scratchbuilding a host of groovy vehicles from other tanks, to AT exploration
vehicles, to astronaut vehicles. Notice the position of the motors and
the gearboxes. If they'd arranged to get the motors up front, or on top
of the gearboxes, then there might be room for driver and gunner figures
in there. Beggars can't be choosers. This is still a swell vehicle, even
if it can't hold figures in the hull in its M5 configuration. This page details some modifications I've done. I
suspect this will be a fun vehicle to modify and play with over time, so
more stuff might be added later.
can. I haven't had this much fun with Joes in a long time! Do I really
have to share this one with my kids? At left you can see the chassis
with the hull's shell removed. This looks like it has a LOT of potential
for scratchbuilding a host of groovy vehicles from other tanks, to AT exploration
vehicles, to astronaut vehicles. Notice the position of the motors and
the gearboxes. If they'd arranged to get the motors up front, or on top
of the gearboxes, then there might be room for driver and gunner figures
in there. Beggars can't be choosers. This is still a swell vehicle, even
if it can't hold figures in the hull in its M5 configuration. This page details some modifications I've done. I
suspect this will be a fun vehicle to modify and play with over time, so
more stuff might be added later.
Volume Control:
 This tank is loud - especially indoors!
Even without the sound effects, the
This tank is loud - especially indoors!
Even without the sound effects, the 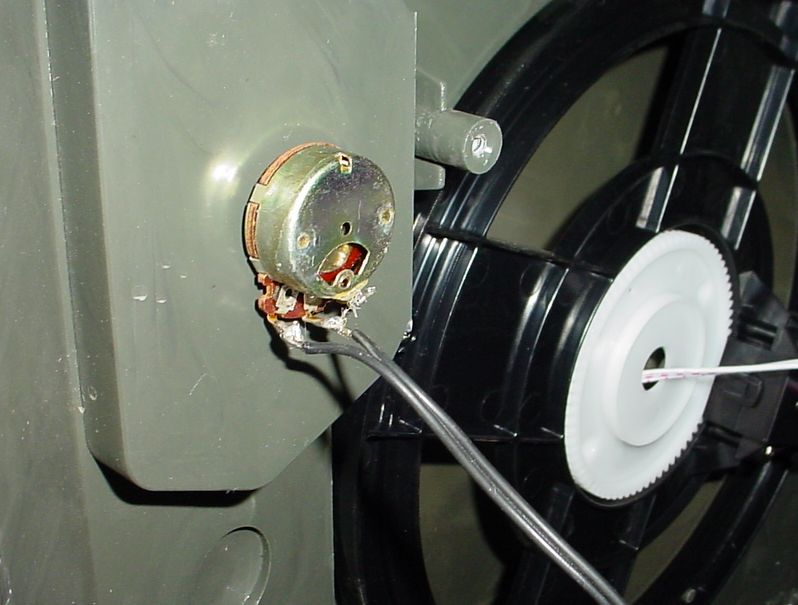 noise of the double gearbox and turret motor is an earful inside.
It needed a volume control. I simply unsoldered one lead of the speaker
and added a potentiometer (easily found at Radio Shack, I'm sure). This
gives me the ability to turn down the volume of the sound effects. You can't
be choosy about which noise it turns down - it's an all or nothing proposition,
but it's a quick and easy mod and keeps non-JoeHeads from being annoyed at the idling
engine as the tank waits in hull-down
noise of the double gearbox and turret motor is an earful inside.
It needed a volume control. I simply unsoldered one lead of the speaker
and added a potentiometer (easily found at Radio Shack, I'm sure). This
gives me the ability to turn down the volume of the sound effects. You can't
be choosy about which noise it turns down - it's an all or nothing proposition,
but it's a quick and easy mod and keeps non-JoeHeads from being annoyed at the idling
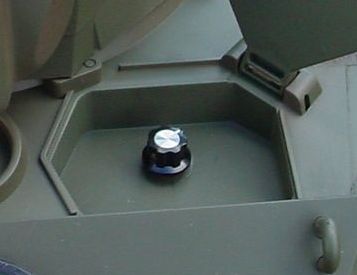
engine as the tank waits in hull-down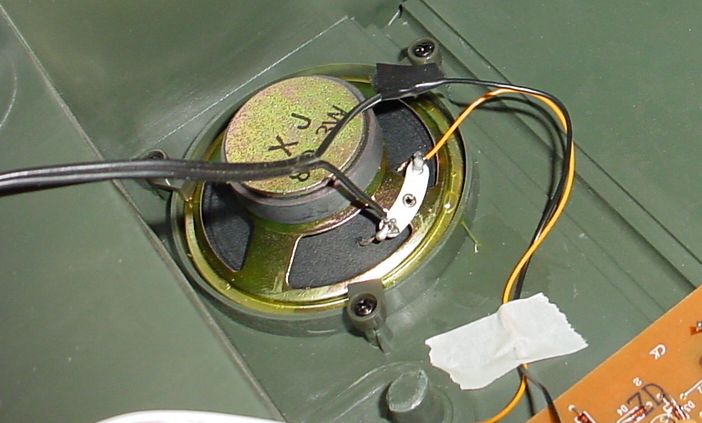 ambush position behind the couch. You can see in the pic that I simply
drilled a mounting hole in the blocked-off driver's compartment to accommodate
the volume control. Even with a knob, it is low enough to still close
the hatch and keep the volume control knob out of sight. Mighty thoughtful
of 21C to leave these hatches functional so I could hide this knob (with
room for expansion if I need to add other stuff in the future ;-) At right
is the speaker, showing where I unsoldered one of the leads to add in the
black twinlead wire running up to the volume control.
ambush position behind the couch. You can see in the pic that I simply
drilled a mounting hole in the blocked-off driver's compartment to accommodate
the volume control. Even with a knob, it is low enough to still close
the hatch and keep the volume control knob out of sight. Mighty thoughtful
of 21C to leave these hatches functional so I could hide this knob (with
room for expansion if I need to add other stuff in the future ;-) At right
is the speaker, showing where I unsoldered one of the leads to add in the
black twinlead wire running up to the volume control.
Driver:
 After adding the volume control,
I thought it might be nice to add a driver's noggin to the hatch... but
now there was a volume control in the way! It was an
After adding the volume control,
I thought it might be nice to add a driver's noggin to the hatch... but
now there was a volume control in the way! It was an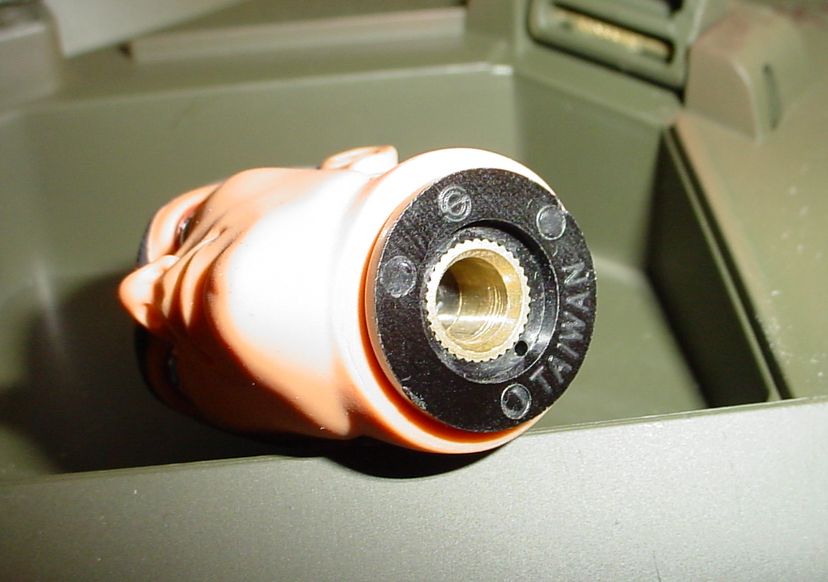 easy fix... I just X-acto'd out the neck hole on a spare head and made
an easy pop-off driver head for the volume control knob. Turn his head right,
volume goes up. Turn his head left, volume goes down. When we want to
close the hatch for battle, we can just pop off the noggin leaving the bare
volume control knob behind and close the hatch tight. Easy!
easy fix... I just X-acto'd out the neck hole on a spare head and made
an easy pop-off driver head for the volume control knob. Turn his head right,
volume goes up. Turn his head left, volume goes down. When we want to
close the hatch for battle, we can just pop off the noggin leaving the bare
volume control knob behind and close the hatch tight. Easy!
Antenna:
 The range of this tank is very short.
I thought that adding an external antenna to the hull might increase its
range a bit. I soldered a lug on the end of the
The range of this tank is very short.
I thought that adding an external antenna to the hull might increase its
range a bit. I soldered a lug on the end of the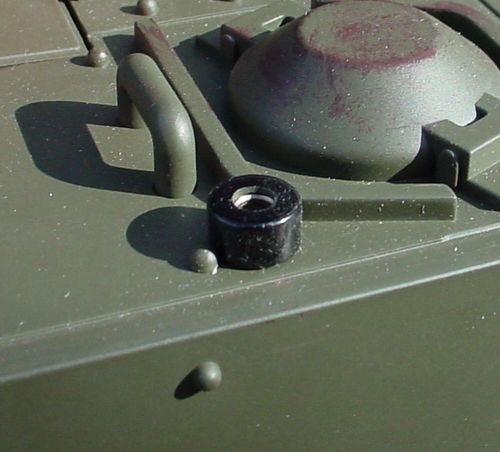 existing antenna inside the hull and ran it to a bannanna socket that
I mounted on the rear deck. I made a quickie antenna out of a coat hanger
and a bannanna plug. At right is the antenna socket I put on the rear
deck. I figured I could paint the black mount, red antenna base, and white
antenna green later. I tried to find a place that was back far enough
so that the antenna would not interfere with the turret's traverse. The parts for this are easily
obtainable at any Radio Shack or electronics store. The antenna is
just an el-cheapo clothes hanger from the dry cleaner's. I figured I could
replace it with slick-looking music wire later on. Unfortunately, this
modification did ABSOLUTELY NOTHING to increase the range of the radio.
In fact, it emphasized the tank's unstable radio and made it worse rather
than better!
existing antenna inside the hull and ran it to a bannanna socket that
I mounted on the rear deck. I made a quickie antenna out of a coat hanger
and a bannanna plug. At right is the antenna socket I put on the rear
deck. I figured I could paint the black mount, red antenna base, and white
antenna green later. I tried to find a place that was back far enough
so that the antenna would not interfere with the turret's traverse. The parts for this are easily
obtainable at any Radio Shack or electronics store. The antenna is
just an el-cheapo clothes hanger from the dry cleaner's. I figured I could
replace it with slick-looking music wire later on. Unfortunately, this
modification did ABSOLUTELY NOTHING to increase the range of the radio.
In fact, it emphasized the tank's unstable radio and made it worse rather
than better! 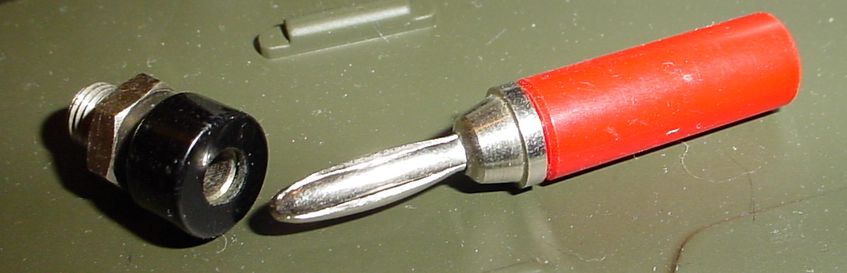 When taking some photos of can-crushing (above), just the
RF interference from my digital camera made it lurch into gear for a second,
and it fired the cannon once, too. Occasionally when driving ahead, just
returning a control lever to neutral (to turn) will fire the cannon. This
radio is VERY susceptible to electronic interference - apparently it has
no filtering of any kind! The external antenna made the problem a lot worse.
With the antenna in place, the tank was practically unusable! (Sigh.)
Not all projects or modifications were meant to succeed, I guess. I'm planning
to leave the antenna socket in the hull. You shouldn't mess with the factory
antenna or it'll likely goof up the efficiency of the unstable little OEM
radio receiver. Leave it alone and it'll work fine.
When taking some photos of can-crushing (above), just the
RF interference from my digital camera made it lurch into gear for a second,
and it fired the cannon once, too. Occasionally when driving ahead, just
returning a control lever to neutral (to turn) will fire the cannon. This
radio is VERY susceptible to electronic interference - apparently it has
no filtering of any kind! The external antenna made the problem a lot worse.
With the antenna in place, the tank was practically unusable! (Sigh.)
Not all projects or modifications were meant to succeed, I guess. I'm planning
to leave the antenna socket in the hull. You shouldn't mess with the factory
antenna or it'll likely goof up the efficiency of the unstable little OEM
radio receiver. Leave it alone and it'll work fine.
Two-way Power Outlet:
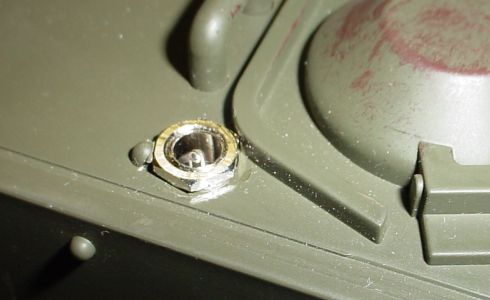 The antenna arrangement didn't work out, so now I had a hole in the rear
deck of the tank. Putting a 12V electrical outlet there made sense, for
powering external attachments (searchlights, winches, etc). The more I thought
about it, the better this idea seemed. If I wired the outlet on the "inboard"
side of the switch, then anything I put on it for a load wouldn't run through
the switch (or be in danger of exceeding the amp rating of the switch - whatever
THAT may be). If the external power outlet goes straight to the battery,
I could also use it for charging the battery without all the disassembly
required to get the battery out of the compartment. The instructions say
to take the battery out for
The antenna arrangement didn't work out, so now I had a hole in the rear
deck of the tank. Putting a 12V electrical outlet there made sense, for
powering external attachments (searchlights, winches, etc). The more I thought
about it, the better this idea seemed. If I wired the outlet on the "inboard"
side of the switch, then anything I put on it for a load wouldn't run through
the switch (or be in danger of exceeding the amp rating of the switch - whatever
THAT may be). If the external power outlet goes straight to the battery,
I could also use it for charging the battery without all the disassembly
required to get the battery out of the compartment. The instructions say
to take the battery out for 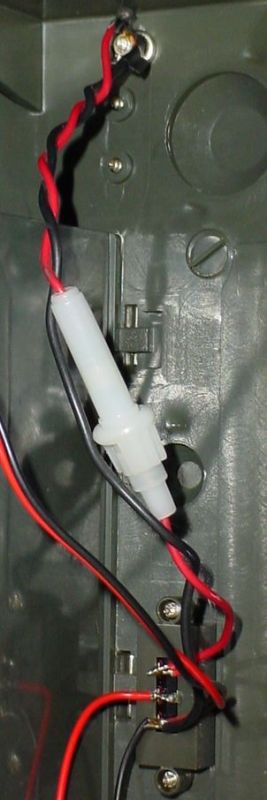 charging, but those Power Wheels vehicles
for kids use the same type of "Gel Cell" batteries and they don't need to
be removed. I dunno what's up with that, but I decided this outlet could
be used for both battery charging as well as powering external stuff. Plus
the hole was already there. At top left you can see the socket. It's
straight from Radio Shack. The outer ring is negative and the center pole
is positive. The socket has 3 connections, 2 of which are normally closed.
The connection comes open when you insert the plug into the socket.
By choosing the right connections, you can have a "dead" socket
charging, but those Power Wheels vehicles
for kids use the same type of "Gel Cell" batteries and they don't need to
be removed. I dunno what's up with that, but I decided this outlet could
be used for both battery charging as well as powering external stuff. Plus
the hole was already there. At top left you can see the socket. It's
straight from Radio Shack. The outer ring is negative and the center pole
is positive. The socket has 3 connections, 2 of which are normally closed.
The connection comes open when you insert the plug into the socket.
By choosing the right connections, you can have a "dead" socket 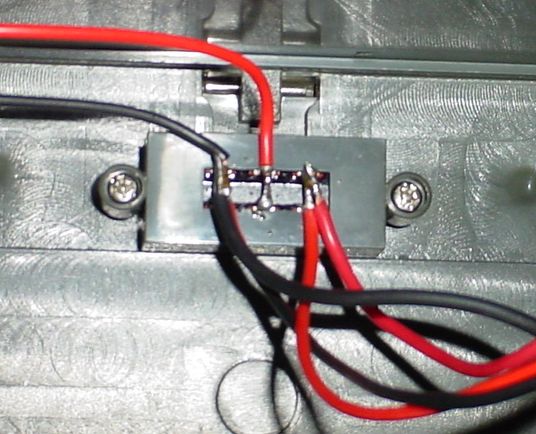 unless and until the plug (male connector)
is inserted. A dead outlet is an important safety device when kids are
using this! At left is how I wired it to the switch. As you can see, the
outlet is attached straight to the battery connections on the back of the
switch. The wires coming from the top left side of that image are the wires
that go to the electronics in the tank, not the battery. At right you can
see the whole shootin' match, from switch to socket, taken from inside the
tank. Note that I added a 3A fuse, just in case. It's always good to use
fuses when you can, especially if dealing with a 7 amp-hour battery! These
batteries are used for emergency power for ham radio stations and as high-powered
emergency lighting in buildings, so they carry quite a bit of juice! I
have used this socket arrangement to power external attachments (like an
automotive spotlight made to plug into a cigarette lighter), and also to
charge the battery (using an awesome "Smart" battery charger from A&A
Engineering that I picked up online from www.a-aengineering.com - no, I
don't know 'em and don't own any shares of stock in the company). This
mod was useful and pretty quick.
unless and until the plug (male connector)
is inserted. A dead outlet is an important safety device when kids are
using this! At left is how I wired it to the switch. As you can see, the
outlet is attached straight to the battery connections on the back of the
switch. The wires coming from the top left side of that image are the wires
that go to the electronics in the tank, not the battery. At right you can
see the whole shootin' match, from switch to socket, taken from inside the
tank. Note that I added a 3A fuse, just in case. It's always good to use
fuses when you can, especially if dealing with a 7 amp-hour battery! These
batteries are used for emergency power for ham radio stations and as high-powered
emergency lighting in buildings, so they carry quite a bit of juice! I
have used this socket arrangement to power external attachments (like an
automotive spotlight made to plug into a cigarette lighter), and also to
charge the battery (using an awesome "Smart" battery charger from A&A
Engineering that I picked up online from www.a-aengineering.com - no, I
don't know 'em and don't own any shares of stock in the company). This
mod was useful and pretty quick.
Trailer Hitch:
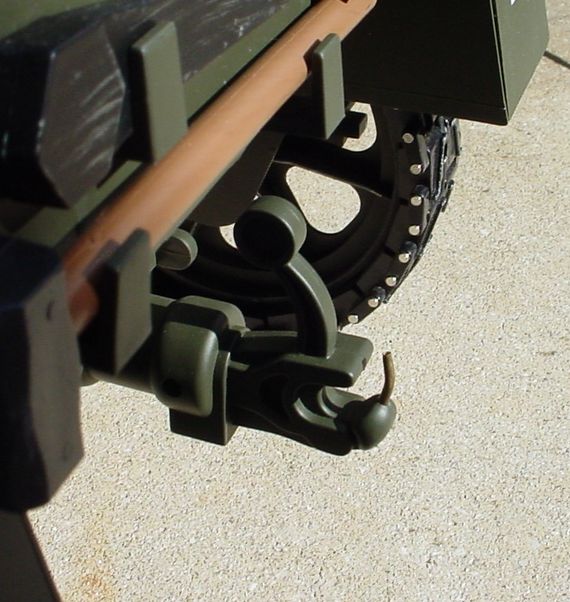 The rounded OEM pintle hitch wasn't
useful for towing anything, so I drilled a little hole in the bottom portion
and drove in a small diameter brass tube, bent in a slight arc. Now it
tows field artillery or trailers with no problem. I'll probably come up
with a better looking version of this, but creativity doesn't always follow
a plan. I got a quick notion to make this mod because we had a Backyard
Battle coming and I needed to tow a howitzer with it. I guess troops would
call this one a "field expedient" modification.
The rounded OEM pintle hitch wasn't
useful for towing anything, so I drilled a little hole in the bottom portion
and drove in a small diameter brass tube, bent in a slight arc. Now it
tows field artillery or trailers with no problem. I'll probably come up
with a better looking version of this, but creativity doesn't always follow
a plan. I got a quick notion to make this mod because we had a Backyard
Battle coming and I needed to tow a howitzer with it. I guess troops would
call this one a "field expedient" modification.
Tank Controls:
 This tank was wired by the factory BACKWARDS! Pushing the left control forward made the right tread move.
Pushing the right control forward made the left tread move. Goofy. At
left is the original wiring. At right is the wiring after I swapped the
leads from the right motor to the left one and vice versa. It's admittedly
tough to see in the pics, but if you look carefully, you can see that the
wiring was just swapped on the two motors. Now it operates like a tank should.
Pushing one control forward and pulling the other back makes the tank do
a donut like a real one. Very cool.
This tank was wired by the factory BACKWARDS! Pushing the left control forward made the right tread move.
Pushing the right control forward made the left tread move. Goofy. At
left is the original wiring. At right is the wiring after I swapped the
leads from the right motor to the left one and vice versa. It's admittedly
tough to see in the pics, but if you look carefully, you can see that the
wiring was just swapped on the two motors. Now it operates like a tank should.
Pushing one control forward and pulling the other back makes the tank do
a donut like a real one. Very cool.
Missile Rack:
 This tank fires soft-tipped projectiles. It comes with 2 of them. When
they're not loaded there's noplace to put them. When one is loaded, the
other is just hanging around in the way. Our solution was to make a rack
for storing 'em. We picked up some white plastic "Command" adhesive cord
clips (manufactured by 3M) and used them as the rack. The double-sided
This tank fires soft-tipped projectiles. It comes with 2 of them. When
they're not loaded there's noplace to put them. When one is loaded, the
other is just hanging around in the way. Our solution was to make a rack
for storing 'em. We picked up some white plastic "Command" adhesive cord
clips (manufactured by 3M) and used them as the rack. The double-sided foam mounting tapes needed trimming,
but other than that it was a quick "peel the back and stick 'em on" kind of installation. I just painted them with Tamiya
acrylic paint. I gave the white paint
a base coat of German grey (dark) followed by a splotchy coat of olive
drab. I thought this would make them look weathered, but the effect was
too subtle to be worth the time (shoulda just painted 'em OD green and
let it go). I do not know how well the paint will hold up to the flexing
of the cord keepers as the projectiles are slid in and out - time will
tell. They're doing fine so far. Even if the paint DOES chip off and
look terrible, that might be ok - the weathered beaten look I was after
might happen through use.
foam mounting tapes needed trimming,
but other than that it was a quick "peel the back and stick 'em on" kind of installation. I just painted them with Tamiya
acrylic paint. I gave the white paint
a base coat of German grey (dark) followed by a splotchy coat of olive
drab. I thought this would make them look weathered, but the effect was
too subtle to be worth the time (shoulda just painted 'em OD green and
let it go). I do not know how well the paint will hold up to the flexing
of the cord keepers as the projectiles are slid in and out - time will
tell. They're doing fine so far. Even if the paint DOES chip off and
look terrible, that might be ok - the weathered beaten look I was after
might happen through use.
Power Switch and Power Outlet Relocation:
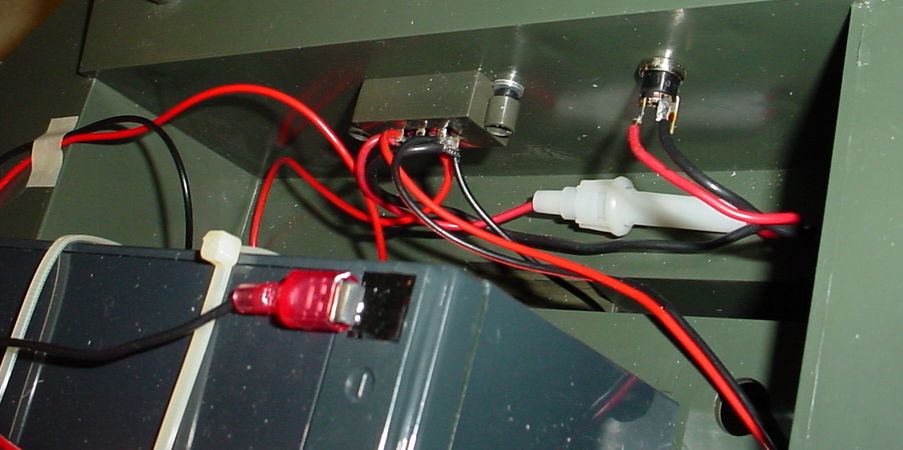 Ok,
you've seen how I rewired the tank for a power outlet and popped it out through
the top of the back deck. Now I wanted to make the chassis complete, without
depending on the body. This way I could eventually make a new body (Personnel
carrier? AT gun? Recovery vehicle? Moon vehicle? Adventure Team vehicle?)
for other purposes. Making the chassis independent from the body would mean
moving the power switch and power outlet I'd just installed onto the bottom
frame somewhere. I decided to put it all in the rear of the chassis. You
can see in the pic above that I made a new mounting point for the switch
Ok,
you've seen how I rewired the tank for a power outlet and popped it out through
the top of the back deck. Now I wanted to make the chassis complete, without
depending on the body. This way I could eventually make a new body (Personnel
carrier? AT gun? Recovery vehicle? Moon vehicle? Adventure Team vehicle?)
for other purposes. Making the chassis independent from the body would mean
moving the power switch and power outlet I'd just installed onto the bottom
frame somewhere. I decided to put it all in the rear of the chassis. You
can see in the pic above that I made a new mounting point for the switch
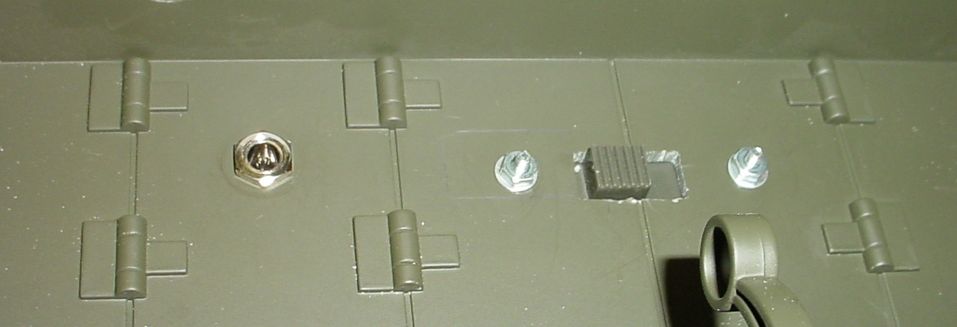 and relocated the power socket. I drilled
a hole for the socket and used a reamer to get it to the right size. For
the swi tch relocation, I drilled a few holes and used a file to clean
it up and make a rectangular slot for the power switch. As a side note,
you can see the battery I'd secured to the chassis with white zip-strips.
This was fine for testing, but the battery ended up moving to a permanent
home (below).
and relocated the power socket. I drilled
a hole for the socket and used a reamer to get it to the right size. For
the swi tch relocation, I drilled a few holes and used a file to clean
it up and make a rectangular slot for the power switch. As a side note,
you can see the battery I'd secured to the chassis with white zip-strips.
This was fine for testing, but the battery ended up moving to a permanent
home (below).
Radio Receiver Relocation:
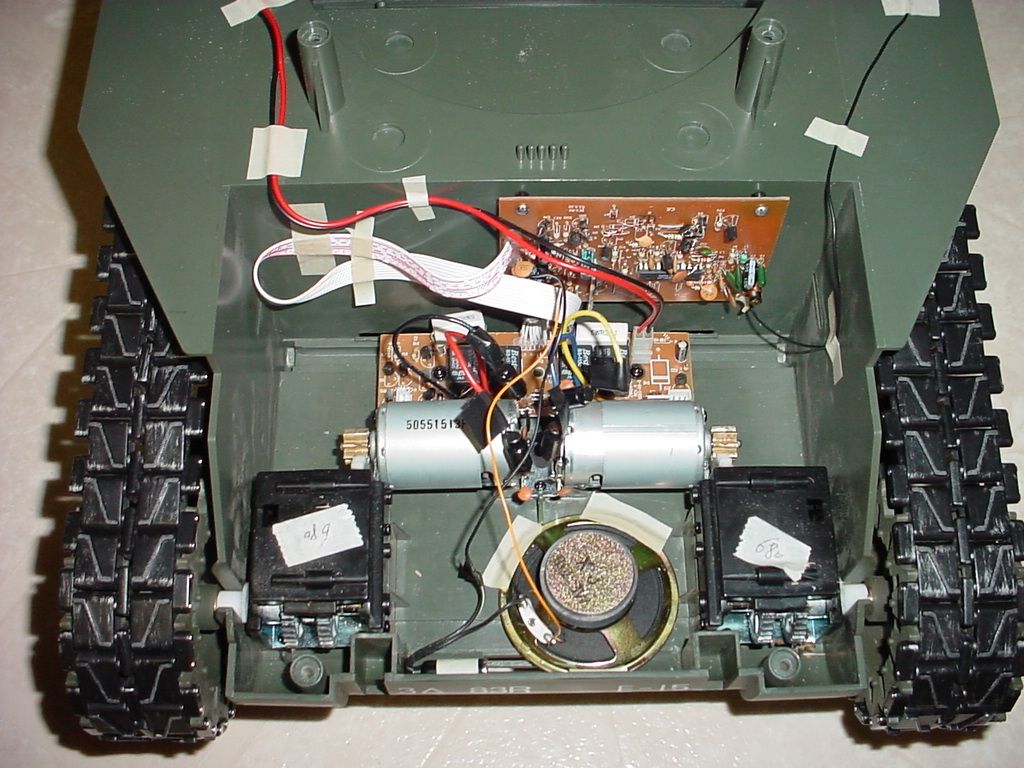 Next came relocating the radio receiver. Here you can see the receiver's
new home. I moved it as far forward as possible. The radio was pretty primitive
and a bit unstable anyway, so I was worried placing it so close to the electric
motors; I thought the electrical noise caused by the motors would affect
the radio. I did it anyway, and was pleased that it had no impact on the
radio whatsoever! You can see where I re-routed the antenna (black wire
at the right). You can also see
Next came relocating the radio receiver. Here you can see the receiver's
new home. I moved it as far forward as possible. The radio was pretty primitive
and a bit unstable anyway, so I was worried placing it so close to the electric
motors; I thought the electrical noise caused by the motors would affect
the radio. I did it anyway, and was pleased that it had no impact on the
radio whatsoever! You can see where I re-routed the antenna (black wire
at the right). You can also see 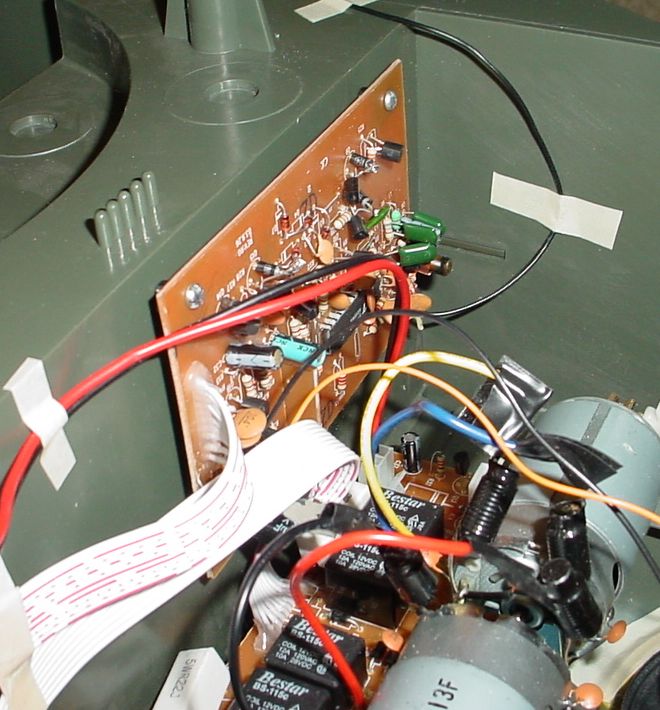 where I put the speaker - in its temporary
location (only held in with tape in this photo). There are some slots in
the hull where the sound escapes and the speaker isn't flush, which
also helps it project sound. Barely visible is an inline mini phone socket.
This is the plug for the volume control wire (discussed elsewhere above).
I made a shorting plug for it so it would operate at full volume for testing
(unplugged it's silent). As for the radio PC board, at left you can see
the mounting method, using 4 small bolts through the bulkhead.
where I put the speaker - in its temporary
location (only held in with tape in this photo). There are some slots in
the hull where the sound escapes and the speaker isn't flush, which
also helps it project sound. Barely visible is an inline mini phone socket.
This is the plug for the volume control wire (discussed elsewhere above).
I made a shorting plug for it so it would operate at full volume for testing
(unplugged it's silent). As for the radio PC board, at left you can see
the mounting method, using 4 small bolts through the bulkhead. 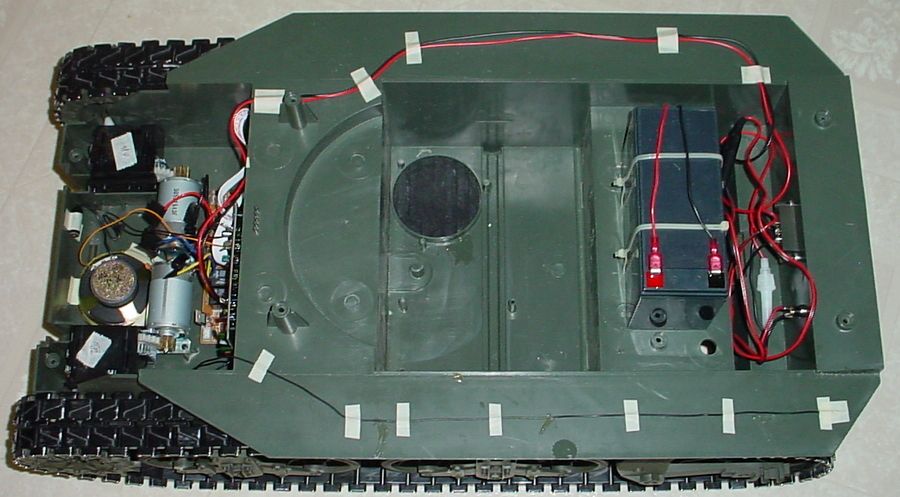 I used necklace beads for standoff insulators
(available at any hobby/craft store, or
from your daughter's craft set). The last thing I did was secure all the
loose wires with little rectangles of masking tape. This cleaned it up a
bit and will prevent floppy wiring from getting hung up in the turret gears
or drive gears. Moving the receiver and speaker forward really opened up
the chassis! Now the chassis was wide open for figure, other equipment,
or as a fighting compartment. As you can see in the pic at right, the only
thing remaining in the way is the battery. Here it's temporarily secured
in place by the zip-strips I mentioned earlier. Moving this to another spot
would be the last move to free up extra space in the chassis.
I used necklace beads for standoff insulators
(available at any hobby/craft store, or
from your daughter's craft set). The last thing I did was secure all the
loose wires with little rectangles of masking tape. This cleaned it up a
bit and will prevent floppy wiring from getting hung up in the turret gears
or drive gears. Moving the receiver and speaker forward really opened up
the chassis! Now the chassis was wide open for figure, other equipment,
or as a fighting compartment. As you can see in the pic at right, the only
thing remaining in the way is the battery. Here it's temporarily secured
in place by the zip-strips I mentioned earlier. Moving this to another spot
would be the last move to free up extra space in the chassis.
Battery Relocation:
Here you can see what we did with the battery.
It was awfully nice of 21C to give us these 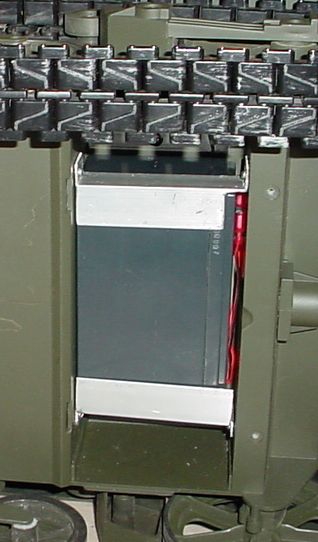 HUGE compartments beneath the chassis, accessed by their own little individual
removable panels. At left you can see the rear access panel removed to reveal
the huge compartment. This compartment is perfect for the battery - it's
as if the folks at 21C left it here for us just for an application like this!
I used soft aluminum "L" stock to make the battery mounting brackets. Just
as a paranoid precaution, I made a cutout near the battery connectors to
prevent it from contacting anything electrical. there seems to be enough
extra space in the compartment to accommodate expansion of the
HUGE compartments beneath the chassis, accessed by their own little individual
removable panels. At left you can see the rear access panel removed to reveal
the huge compartment. This compartment is perfect for the battery - it's
as if the folks at 21C left it here for us just for an application like this!
I used soft aluminum "L" stock to make the battery mounting brackets. Just
as a paranoid precaution, I made a cutout near the battery connectors to
prevent it from contacting anything electrical. there seems to be enough
extra space in the compartment to accommodate expansion of the 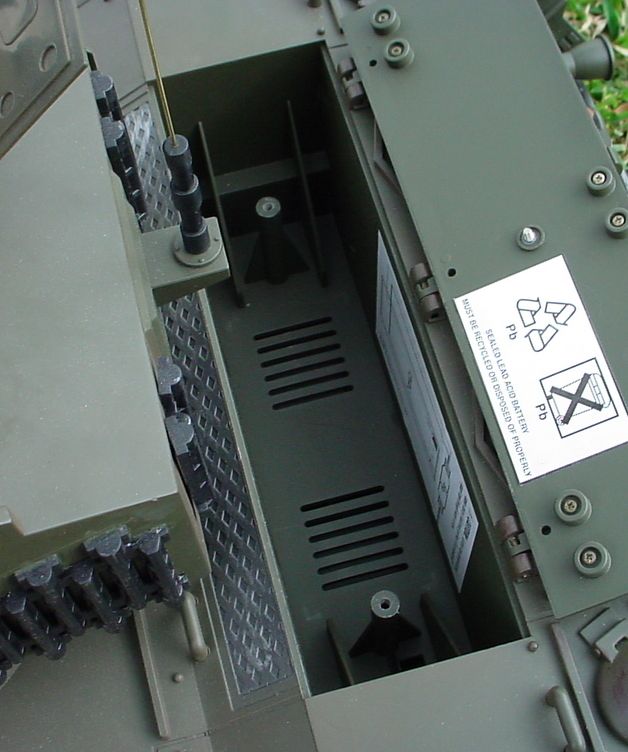 battery during charging. Sorry I can't give you any specifications
for the brackets, as I just sort of "did it." I used my vise, hammer, hacksaw,
coping saw, files, and bench grinder to get them to fit properly. They might
not look pretty, but they're a perfect fit - not loose enough to require
washers and not so tight that they're stressing the plastic. I used a drill
and diagonal cutters to make a rectangular hole to feed the power wires
and plug through to get 'em to the switch and power outlet in the rear of
the tank. This ended up being an easier mod than I thought, believe it or
not! This frees up the last of the available space on the chassis. Now
it's open for other bodies and uses. As you can see from the pic at right,
the former battery location becomes a groovy storage bin for odds and ends
(like power cords, machine guns, screwdrivers, etc). This tank gets cooler
every day!
battery during charging. Sorry I can't give you any specifications
for the brackets, as I just sort of "did it." I used my vise, hammer, hacksaw,
coping saw, files, and bench grinder to get them to fit properly. They might
not look pretty, but they're a perfect fit - not loose enough to require
washers and not so tight that they're stressing the plastic. I used a drill
and diagonal cutters to make a rectangular hole to feed the power wires
and plug through to get 'em to the switch and power outlet in the rear of
the tank. This ended up being an easier mod than I thought, believe it or
not! This frees up the last of the available space on the chassis. Now
it's open for other bodies and uses. As you can see from the pic at right,
the former battery location becomes a groovy storage bin for odds and ends
(like power cords, machine guns, screwdrivers, etc). This tank gets cooler
every day!
Replacement Model antenna:
The turret antenna that came with this tank was kid-safe. 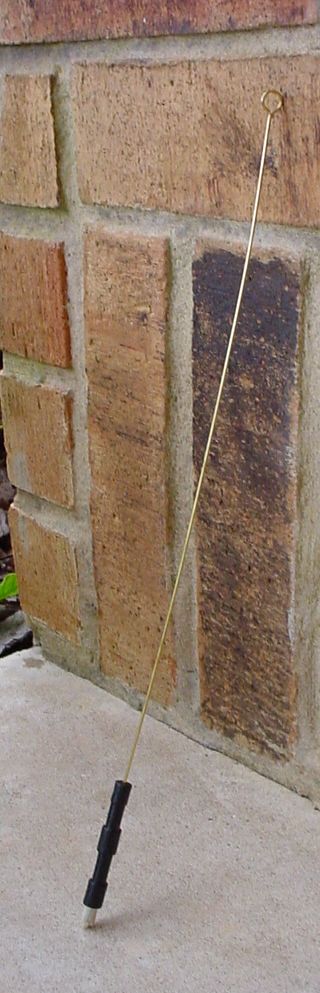 This means it was bendy and floppy and it looked pretty bad. The base didn't
fit in the mounting hole very well, either. We solved the mounting hole
problem by a single layer of masking tape around the peg portion of the antenna
base. It was a "two second" solution that's worked fine. As for the antenna
mast, our solution (as it is for lots of 1/6 problems) was brass! We picked
up some brass wire at a hobby store and used it for the antenna. We used
an X-acto knife to cut off the existing antenna. We found a drill bit that
was slightly smaller in diameter than the brass rod (or brass wire... it
was pretty thin), and carefully drilled down into the soft plastic antenna
mount about halfway. Don't use a high-speed drill for this or you'll have
a melted mess in your hands! We poked the brass rod down into the hole and
it "friction fit" just fine. So no kids would poke out an eye, I used a
pair of needlenose pliers to make a small loop at the end. Brass is pretty
soft, so if any kid gets this in the wrong place it'll likely bend before
doing any damage. Since it's soft, it's easy to bend into a gentle arc for
an added look of realism.
This means it was bendy and floppy and it looked pretty bad. The base didn't
fit in the mounting hole very well, either. We solved the mounting hole
problem by a single layer of masking tape around the peg portion of the antenna
base. It was a "two second" solution that's worked fine. As for the antenna
mast, our solution (as it is for lots of 1/6 problems) was brass! We picked
up some brass wire at a hobby store and used it for the antenna. We used
an X-acto knife to cut off the existing antenna. We found a drill bit that
was slightly smaller in diameter than the brass rod (or brass wire... it
was pretty thin), and carefully drilled down into the soft plastic antenna
mount about halfway. Don't use a high-speed drill for this or you'll have
a melted mess in your hands! We poked the brass rod down into the hole and
it "friction fit" just fine. So no kids would poke out an eye, I used a
pair of needlenose pliers to make a small loop at the end. Brass is pretty
soft, so if any kid gets this in the wrong place it'll likely bend before
doing any damage. Since it's soft, it's easy to bend into a gentle arc for
an added look of realism.
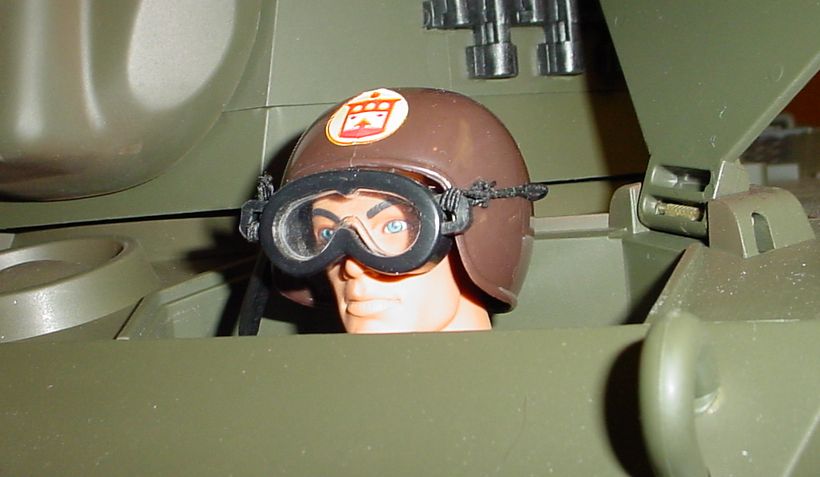
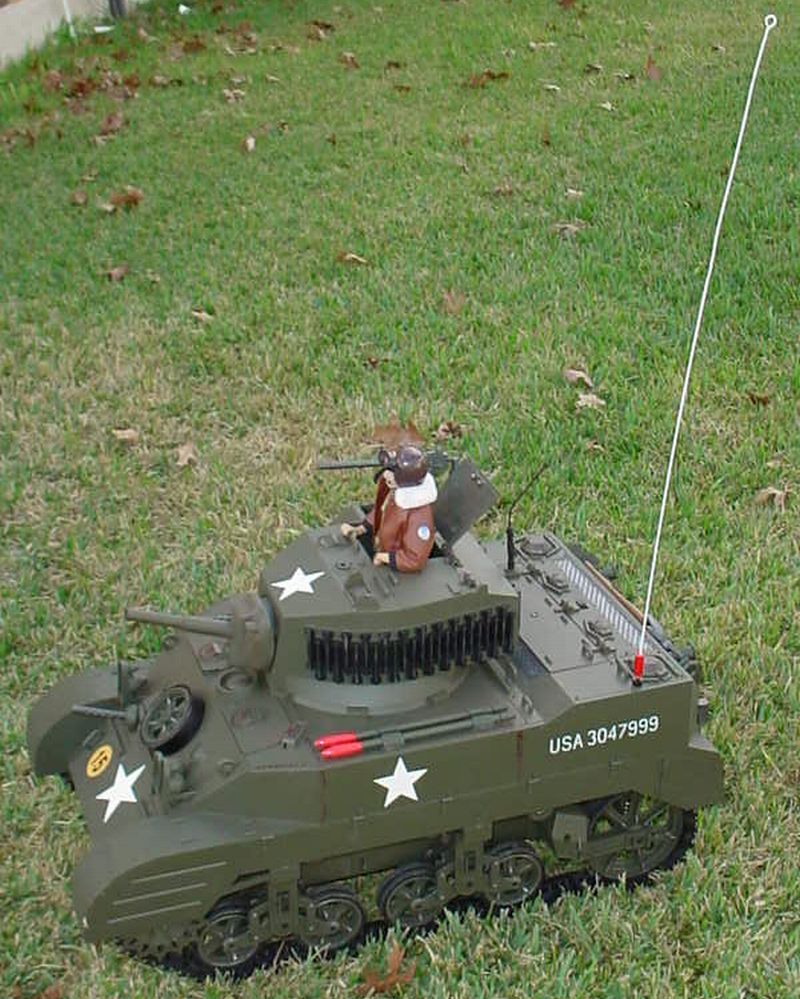
Tank Commander:
The one thing missing from the project was the 21C Tank Commander. When
these came out, I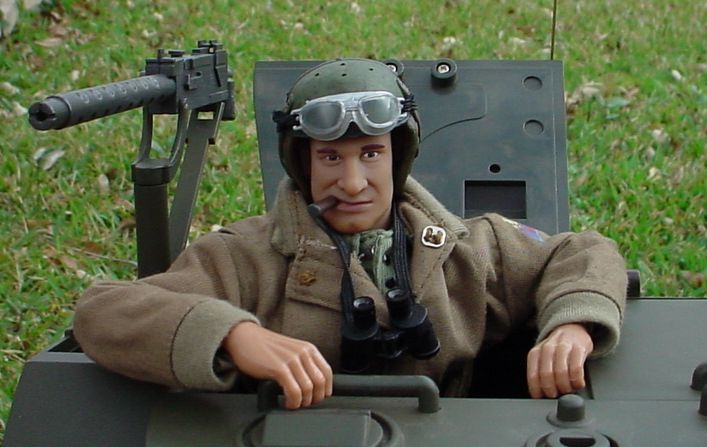 had no tank. Now I had an awesome R/C tank and no commander! I popped
off an email to everybody's 21C
had no tank. Now I had an awesome R/C tank and no commander! I popped
off an email to everybody's 21C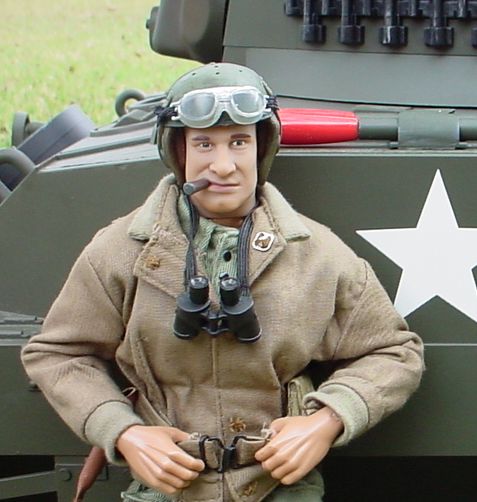 hero - Arlene Abrego - and she sent me a clearance-priced "damaged box"
tank commander right away. (You rock, Arlene!) This tank commander is a
really cool figure. He sure looks the part! That tanker's helmet is the
coolest 1/6 peice to come down the pike in a long time. Now the tank is
complete. Many have argued that there isn't enough room in the turret for
the guy's legs, but that's just 'cause they're whiners. The turret is plenty
large enough to stuff a figure in there as you can see above. In fact, he
can go a bit lower, but I wanted his arms out. If you really wanted a "chicken
peeking out from a crack in the hatch" then you could always use a donor
torso and stick a helmet on it. Personally, I think this tank is awesome
and dandy as-is. My kids sure don't have any complaints!
hero - Arlene Abrego - and she sent me a clearance-priced "damaged box"
tank commander right away. (You rock, Arlene!) This tank commander is a
really cool figure. He sure looks the part! That tanker's helmet is the
coolest 1/6 peice to come down the pike in a long time. Now the tank is
complete. Many have argued that there isn't enough room in the turret for
the guy's legs, but that's just 'cause they're whiners. The turret is plenty
large enough to stuff a figure in there as you can see above. In fact, he
can go a bit lower, but I wanted his arms out. If you really wanted a "chicken
peeking out from a crack in the hatch" then you could always use a donor
torso and stick a helmet on it. Personally, I think this tank is awesome
and dandy as-is. My kids sure don't have any complaints!
Hopes for the Future:
What should 21C make next? That's a tough
one. If they made a German tank, they'd probably sell like hotcakes!
Now that we're all buying up the Stuarts, the poor tankers need
someone to do battle with. Maybe a small
German tank comparable to the Stuart... like a Pzkw 38(t) or a Mark II. Those
are both small and light - and would be good matches for the Stuart.
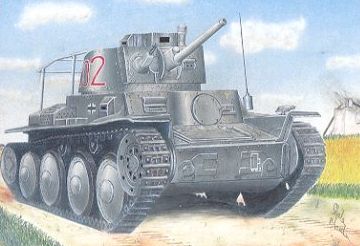
 The Pzkw 38(t) would be great,
at it is a light tank with the right size cannon. As a bonus, it was also the basis for other
German vehicles as well, such as the Hetzer tank destroyer, and also became the basis
for the Marder antitank gun. Thus, a
single chassis
The Pzkw 38(t) would be great,
at it is a light tank with the right size cannon. As a bonus, it was also the basis for other
German vehicles as well, such as the Hetzer tank destroyer, and also became the basis
for the Marder antitank gun. Thus, a
single chassis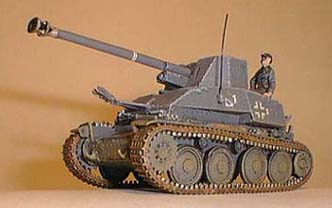 could provide 21C with a basis for
a couple of different tanks just by changing the hull. Even if 21C never
did anything but the basic Pzkw 38(t) tank, it'd still be a great chassis
for custom work!
could provide 21C with a basis for
a couple of different tanks just by changing the hull. Even if 21C never
did anything but the basic Pzkw 38(t) tank, it'd still be a great chassis
for custom work!
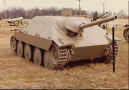
 Another cool option would be the Mark III. This was
 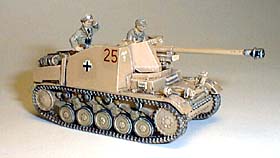 another design that was used for a variety of purposes. The Mark III
saw action on about every front. It was also the basis for the Marder II
antitank gun. Again, this would be a useful design and one 21st Century
ought to be thinking about. Oh, if I were only a toy designer...
another design that was used for a variety of purposes. The Mark III
saw action on about every front. It was also the basis for the Marder II
antitank gun. Again, this would be a useful design and one 21st Century
ought to be thinking about. Oh, if I were only a toy designer...
LMK what you think of this project, or any
other stuff you stumble across on my website!
- ATC
Click the logo to go home ![]()
or click the bar to email me, the ATCommander@adventureteam.com ![]()