|
|
|
AT Commander's
6x6 Super Jeep
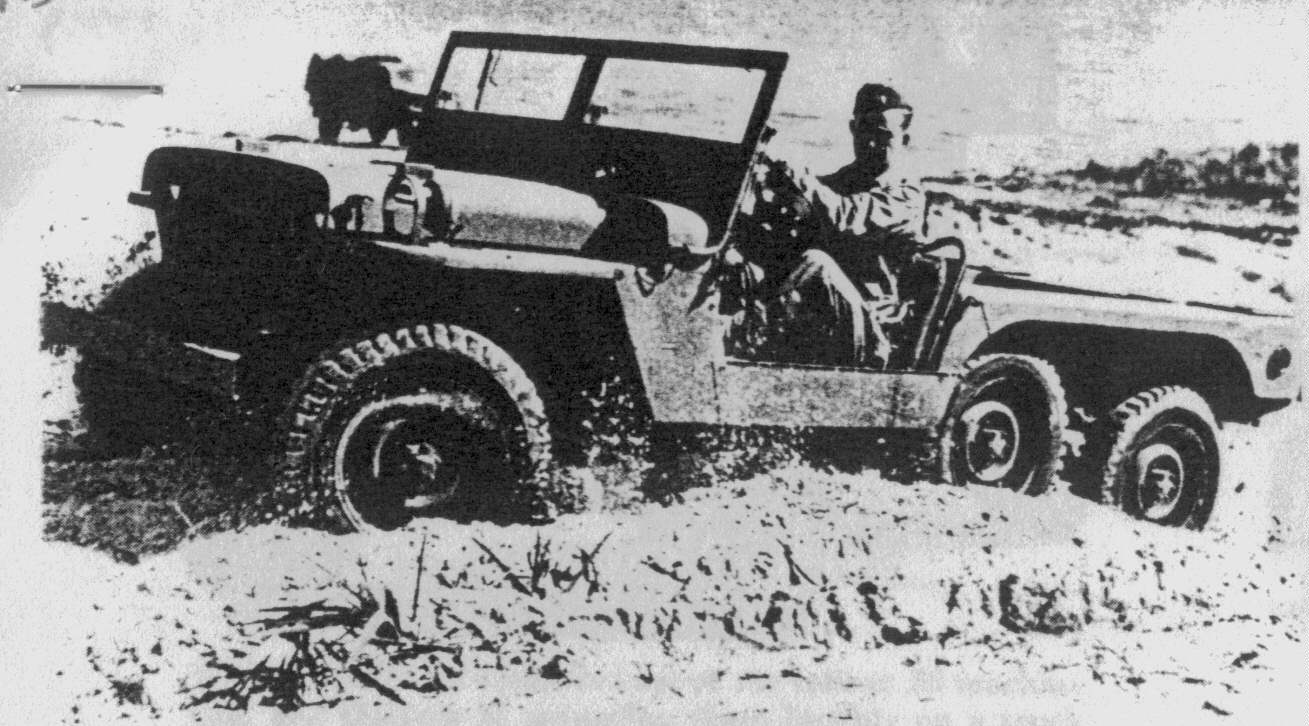
In 1942, it was apparent that the US needed a slightly larger platform than the venerable Willys Jeep to perform light truck duties. The Willys was built into a 6x6 configuration and tried, experimentally, in a number of different roles. It appeared in armored, ambulance and anti-aircraft configurations, to name a few. Willys had great plans for the Super Jeep, and went so far as to print up advertising "slicks" for distribution to senior officers. Willys claimed the new Super Jeep weighed in at 3,100 lbs (compared to the usual 5,250 lb 4x4), would save 60 lbs of rubber , 2000 lbs of steel, could operate on 40% less fuel and 20% less motor oil. 65% of the Super Jeep's parts were interchangeable with the usual 4x4 design. The Super Jeep had a wider cowling, adding 10" to the width of the windshield as well. This picture below was taken in January of 1943, as the Super Jeep was being put through its paces in the sand dunes at Camp Gordon Johnson, Florida.
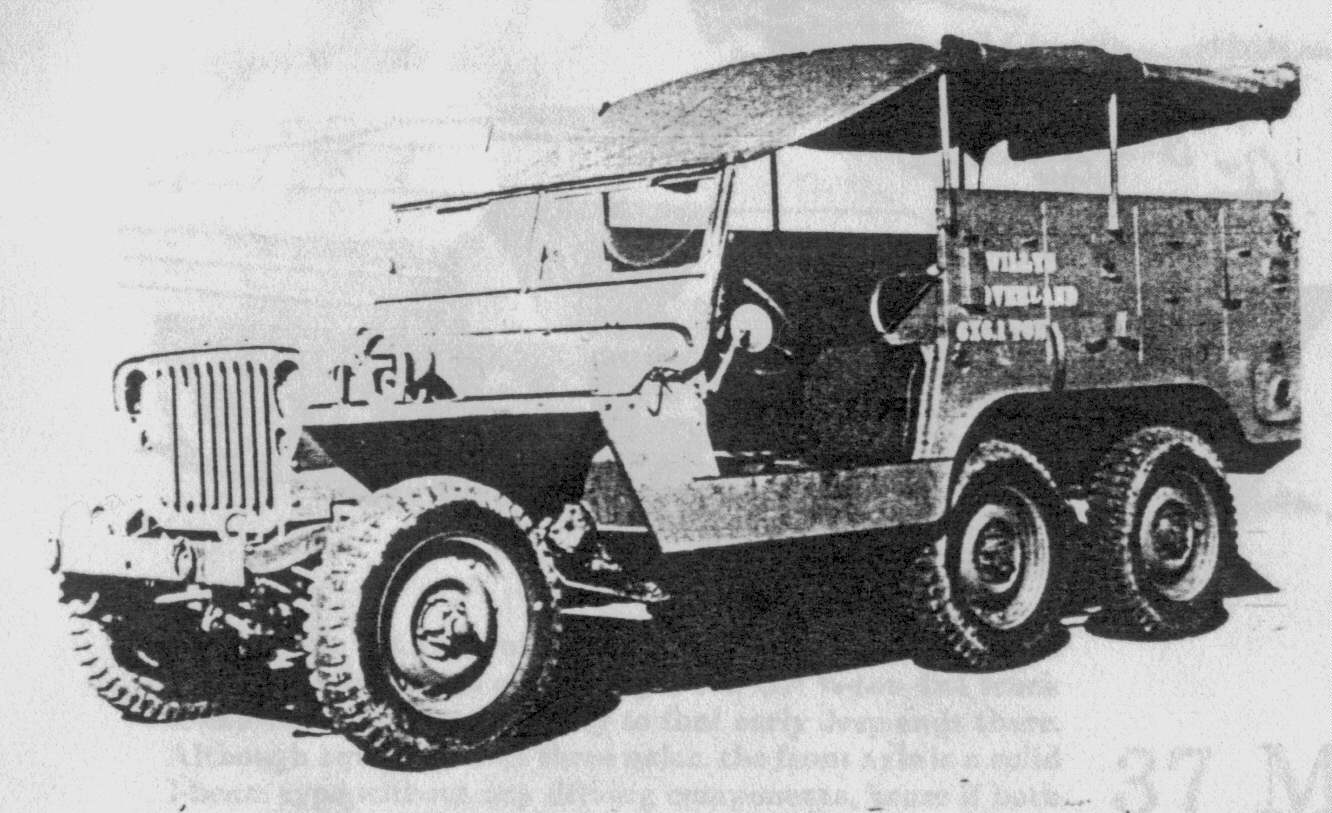
The version at left carried a 1-ton designation, even though it
was the same 3/4 ton Super Jeep. This version is a personnel carrier
carrying seats for 8 troops plus driver and passenger. The normal Jeep
engine was used: the 4 cylinder Willys MB powerplant displaced 134
cubic inches, developing 60 hp, and had gave the jeep a top speed 55
miles per hour. This version carried 20 gallons of fuel, giving it a
range of approximately 300 miles.
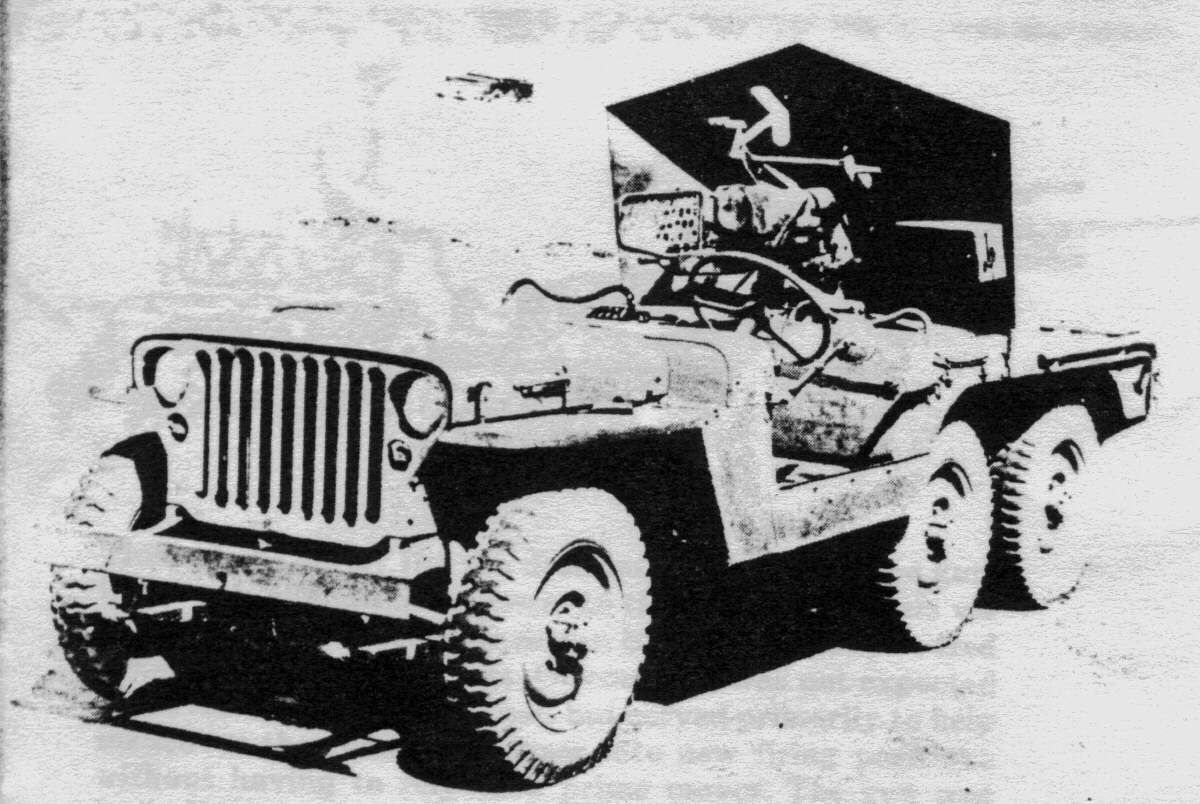
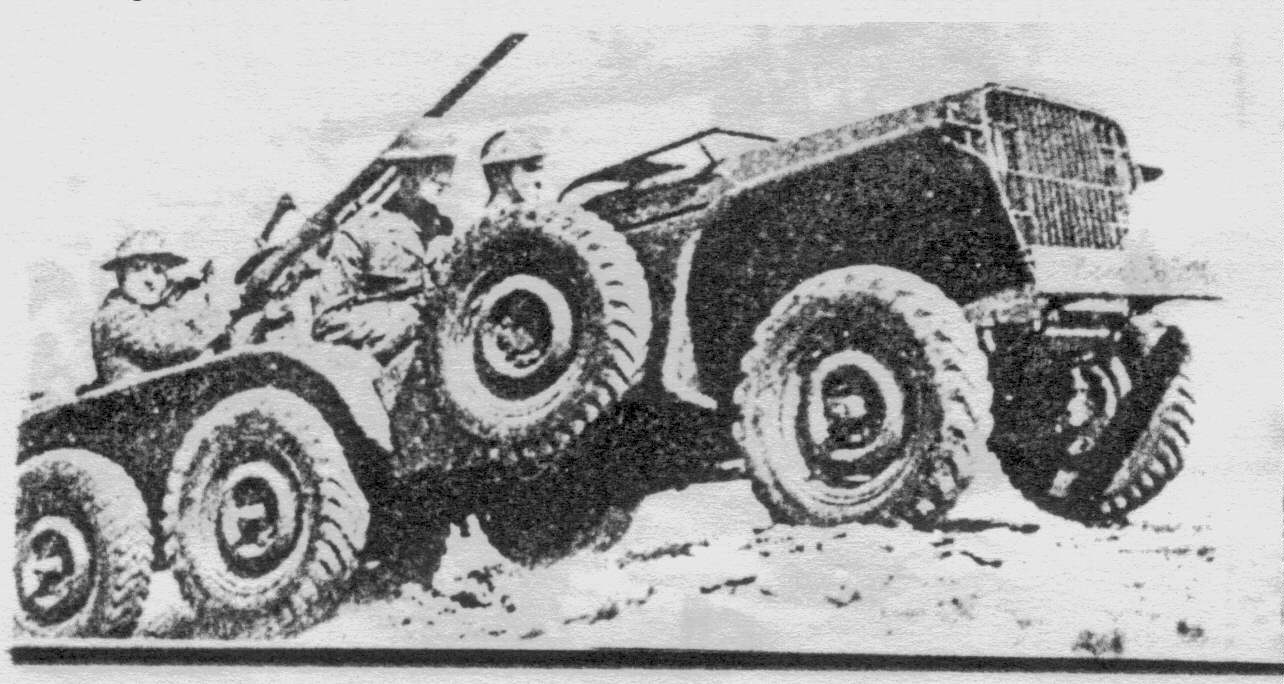
The 6x6 Super Jeep (right) also saw duty as a gun carriage, the
version to the right sporting a 37mm AT cannon and armor for the gun
crew. This version was tested in March of 1943. On this vehicle, the
cannon faced the rear, and had a 360 degree traverse. In tests, the
37mm cannon was considered adequate, but lack of storage space in the
Super Jeep and the lack of protection for the crew met with great
criticism. An armored scout car version of this chassis also appeared
(but no photo is available).
Source: This material was excerpted and edited from U.S. Military
Weeled Vehicles by Fred W. Crimson, Crestline Publishing, copyright
1983 (available for review at the reference section of the USAF Academy
library).
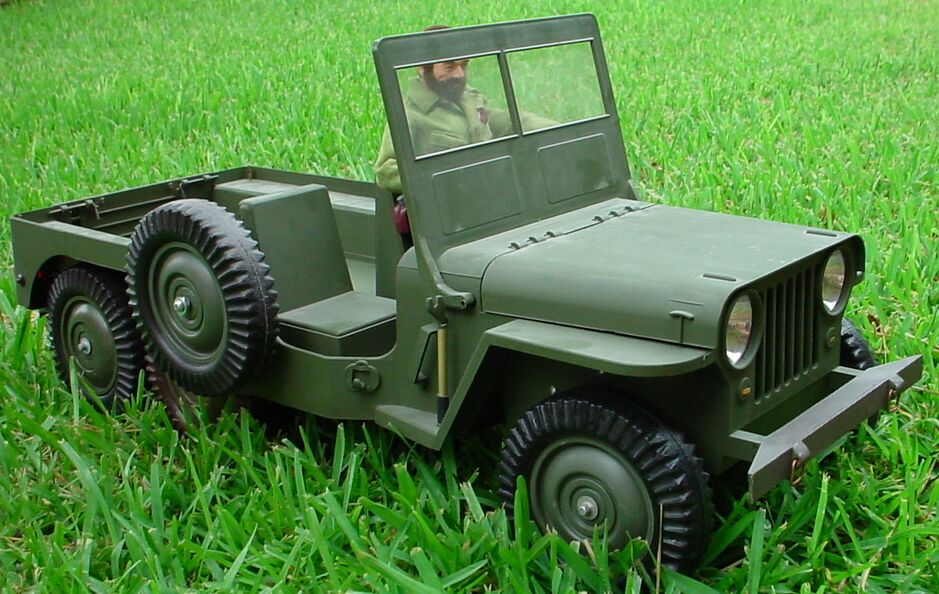
The GI Joe 6x6 "Super Jeep"
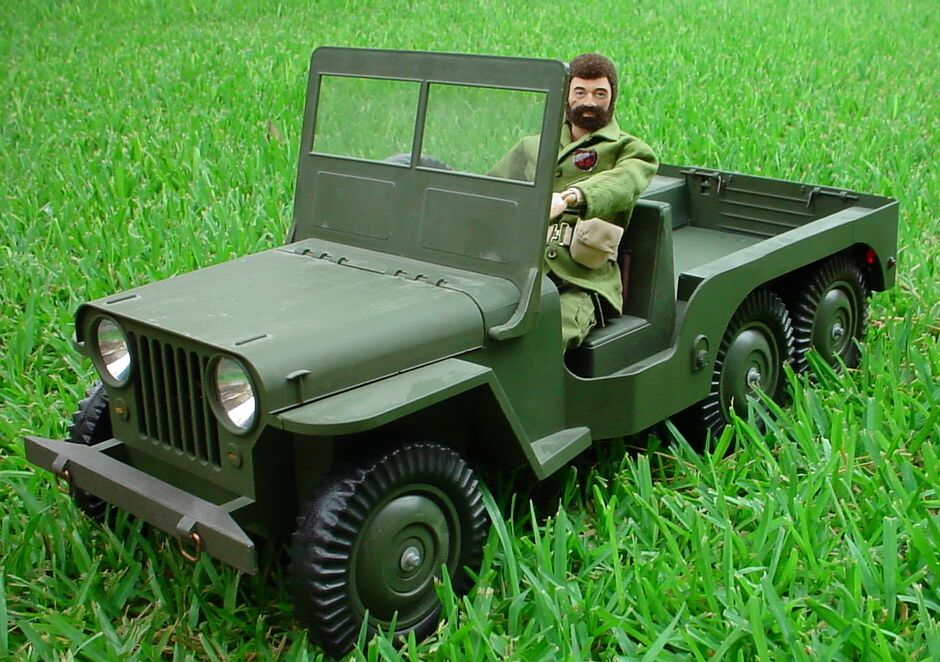
Here is the AT Commander on a Backyard Patrol
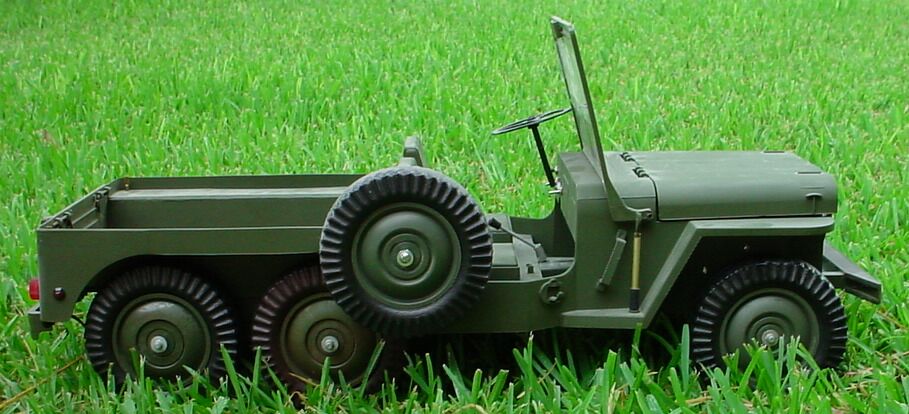

This project began in December of 1998. It was ostensibly completed by August of 2000. Sandboxer Paul Mangan had donated a derelict 5-Star GI Joe jeep hull to me for salvage and experimentation (which I gladly accepted). I cut the rear of the Jeep off from fender to fender and extended the bed with sheet plastic. Then I added a floor to make a cargo version of the Super Jeep.
Next came working headlights made from freebie flashlights (buy
batteries and get two lights free!) from Wal-Mart which were perfectly
sized for the job. The working headlights are powered by the 2 "D"
batteries originally intended to operate the tripod-mounted searchlight.
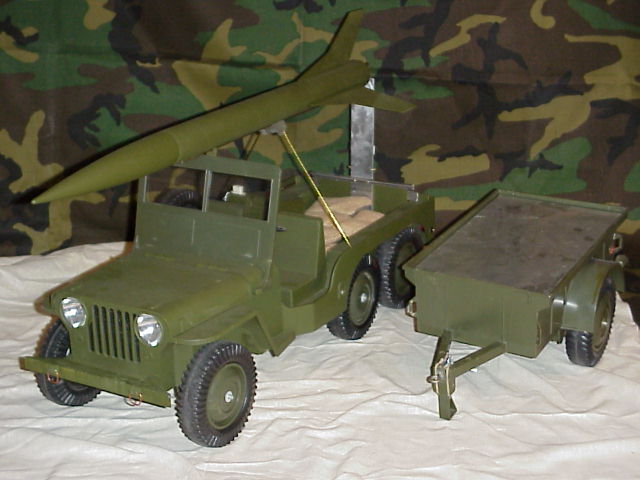
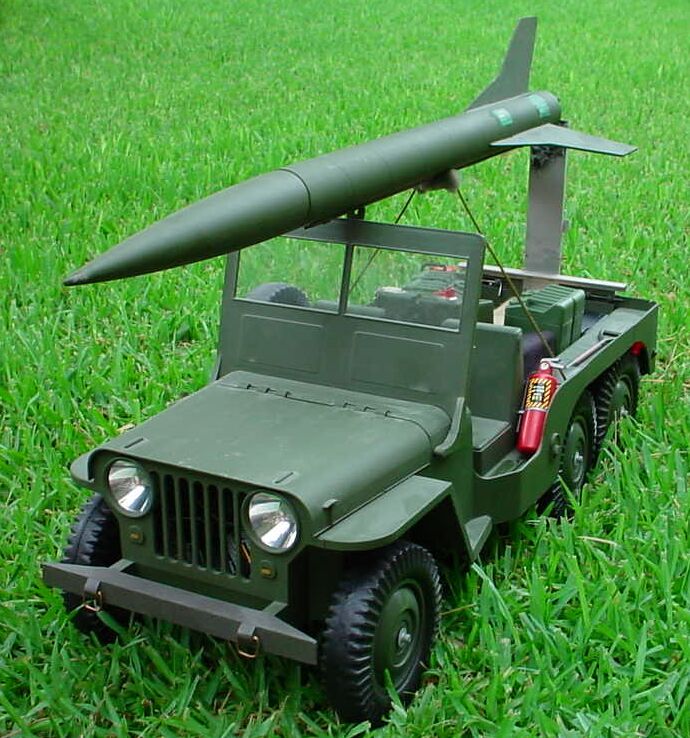
The cargo version was great, but next version was even better! It included a rocket launcher (as seen in the image below). This vehicle, along with its dedicated trailer, carries all of the necessary gear to launch Estes rockets - including extra supplies for multiple launches! The sandbags carried in the rear of the jeep's cargo area are for "chocking" the wheels prior to launch. (If the vehicle were to roll during a launch sequence, the results could be disasterous!)
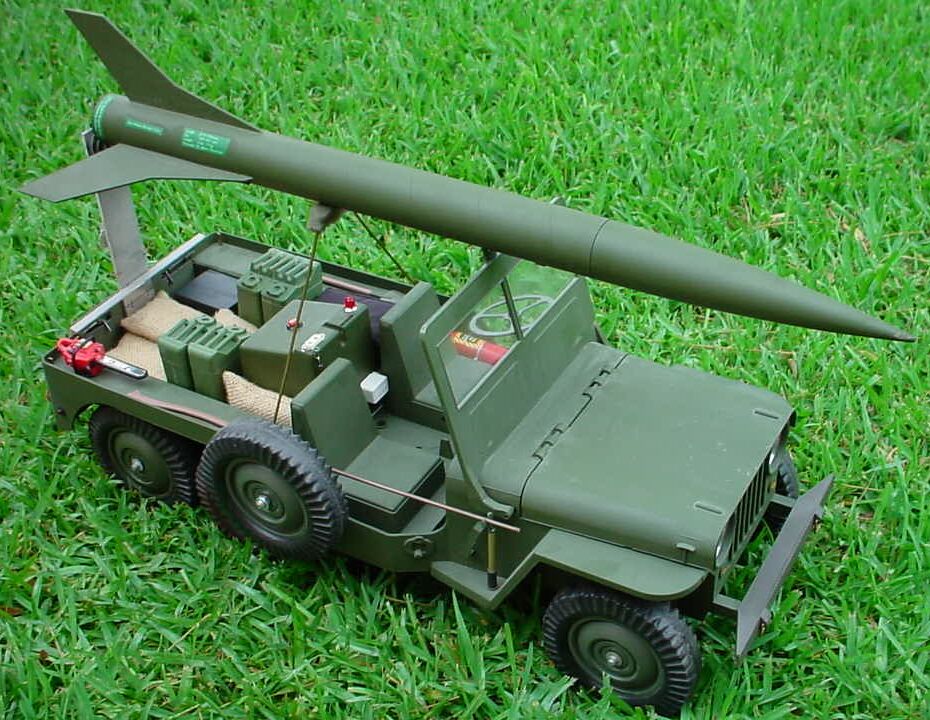
Here's a pic of the rocket version ready to roll (sans trailer). This pic shows how everything stows. The launch panel fits behind the front seats, the buzzer between them to keep it from sliding around. The control panel is sandbagged for additional security. Just behind the driver's seat is a computer, and the laptop is between the gas cans and tailgate. The chainsaw and fire extinguisher are refrigerator magnets. You can also see the custom front bumper I added. The launch rod is 2-piece. Half of it is permanently mounted to the swing-down launch platform while the other stows neatly on the passenger side. The peg originally used for the flag now houses a "Y" peg on a brass tube that secures the front of the launch rod. The rear is secured by a brass tube fitting poked into an existing 5-Star hole in the fender well. Although it's hardly noticeable, there is a removable "Y" peg that slides into a keeper on the back side of the windshield as well. This keeps the rocket from wobbling around when we're pushing it across the yard. You'll note the "A" frame behind the front seats. This frame is simply thick clotheshanger wire with foam threaded on it in the middle (where it's got a little bit of a "U" bend in it at the apex). This also provides stability for the rocket. I actually threaded the foam on the hanger like putting a worm on a hook - nothing special, just crammed it on. Looks great, works great!
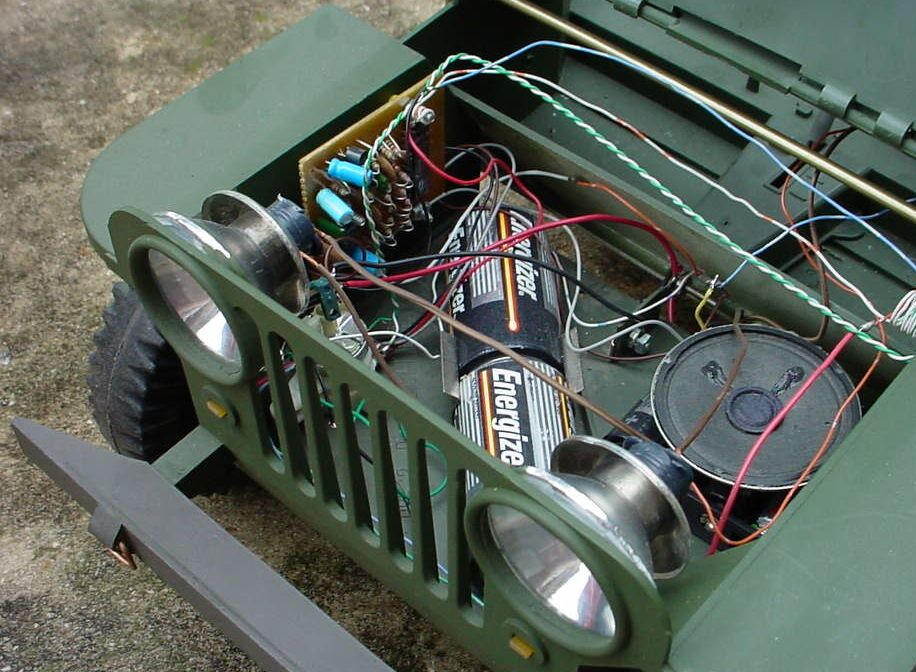
It already had headlights that I'd installed earlier, but it still needed something more... so I added a PC board that provided engine sounds, and the capability to create ignition and horn sounds as well. I took this opportunity to make the headlight wiring more robust, too (it had been just temporary before). You can see the audio board on the passenger side of the fender well. Beneath the speaker is the battery box. These batteries power the engine, tail lights and marker lights, but not the headlights. The headlights are powered from the two "D" cells that were originally indended to power the 5-Star searchlight. This is a good pic showing the headlight mounts. The bar running parallel to the dash (with wires running roughly parallel to it) is a brass tube. This brass tube is the hinge pin for the windshield. I can slide it out to remove the windshield.
This pic also shows a bit more of the bumper. The hull had a broken
bumper, so I needed to add something. I made the two hooks out of #12
copper wire. Not particularly strong, but they sure look good.
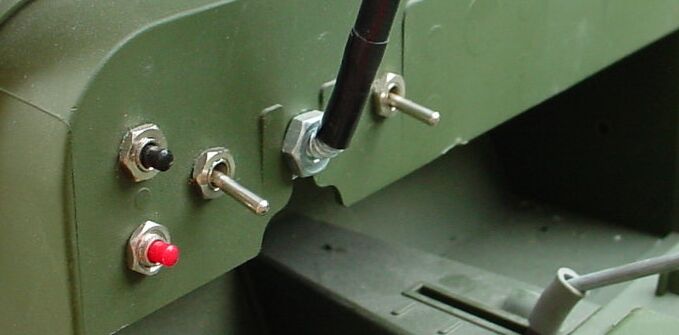
Here's a pic of the control panel. I lacked a steering wheel, so
I had to "carve" one out of sheet plastic. No steering column, either.
For a steering column, I just found a bolt the right size, added a
couple of nuts and a lock washer, then bent it in a vise (after
mounting the steering wheel). A bolt on each side of the dash holds it
in place (there are 2 bolts on the back side, along with a lock
washer). The buttons and switches here perform a variety of functions.
Red is the starter to start up the engine. Black is the horn. The left
switch is the ignition switch (just like a real jeep, you have to throw
on the ignition before hitting the starter (cool, huh?). When you turn
on the ignition, the running lights come on. The switch on the right is
for the headlights. Moving the shifter forward speeds up the engine
sounds; pulling it back slows the engine sound down. When the vehicle
stops (returns from high gear to idle), the air brakes sound off.
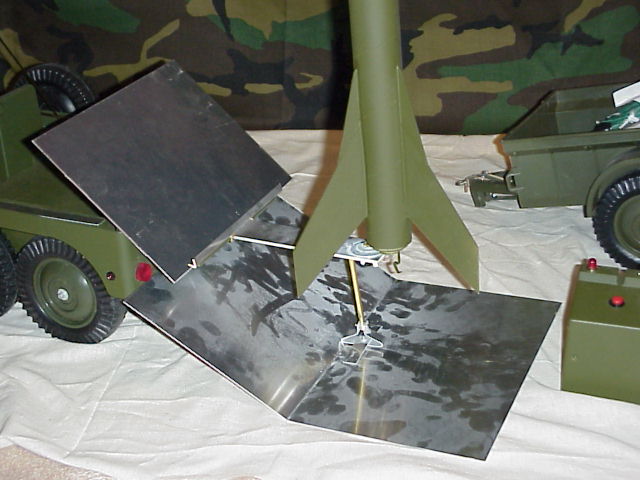
At right is a picture of the rocket ready to launch, with blast shields in place. Yes, it really, really works, as you can see from the smoke and blast debris on the shields (actually the white dusty stuff is the debris, the dark streaks are spots where fingers, fins, wires, etc have disturbed the gunk). The blast shields protect the jeep from exhaust damage as the rocket lifts off. The rocket-launching 6x6 5-Star is useful in a defense role, a deterrence role, or as a scientific role with organizations such as the Adventure Team. This rocket-launching platform is useful for a variety of purposes and a variety of missions. Flexible firepower at its best!
With new, devastating, highly capable weaponry like the 6x6
rocket-launching 5-Star Super Jeep in Joe's inventory, no threat to
freedom will remain unchallenged. No obstacle will be too great. No
threat to democracy will be insurmountable. Backyard Peace will be
forever be assured by the tirelessly vigilant defender of truth,
justice, and Freedom...
...GI Joe: America's Moveable Fighting Man!
Click here to return to the AT Commander's home page ![]()
|
|